
Probate Walkthrough Menu #
The Probate Walkthrough Menu is your step-by-step guide through the application. It is colour coded so you know the exact status of each section, and stage, of the the process.
- If a stage, or section, is shown in green, it has been assigned as complete.
- If a stage, or section, is shown in orange, it has been assigned as incomplete.
- If a section has a black key-line, it is the current section you are on, indicating the first time you have visited the section.
- If a stage, or section, is greyed-out, you cannot access this section yet as you haven’t reached it through the journey.
You can return to any section of the Probate Walkthrough Menu, once you have already journeyed through the section. Simply click on the section you wish to visit.

Please Note: If you do not know or have the answer to any question field, you can leave it blank and return to complete it when you have it. If there is information that has not been completed, that is required for the Probate and IHT application forms. You will only be able to assign the section as ‘incomplete’. This section will now display in orange on the ‘Probate Walkthrough Menu’. You will need to return at a later point to complete the required information. You can still proceed through the Probate Walkthrough. All sections must be completed (displayed in green on the ‘Probate Walkthrough Menu’) in order to generate the Probate and IHT application forms.
Getting Started #
Details of the Deceased #
Useful Articles related to Details of the Deceased:
Details of the Deceased
Marital Status – What you need to know
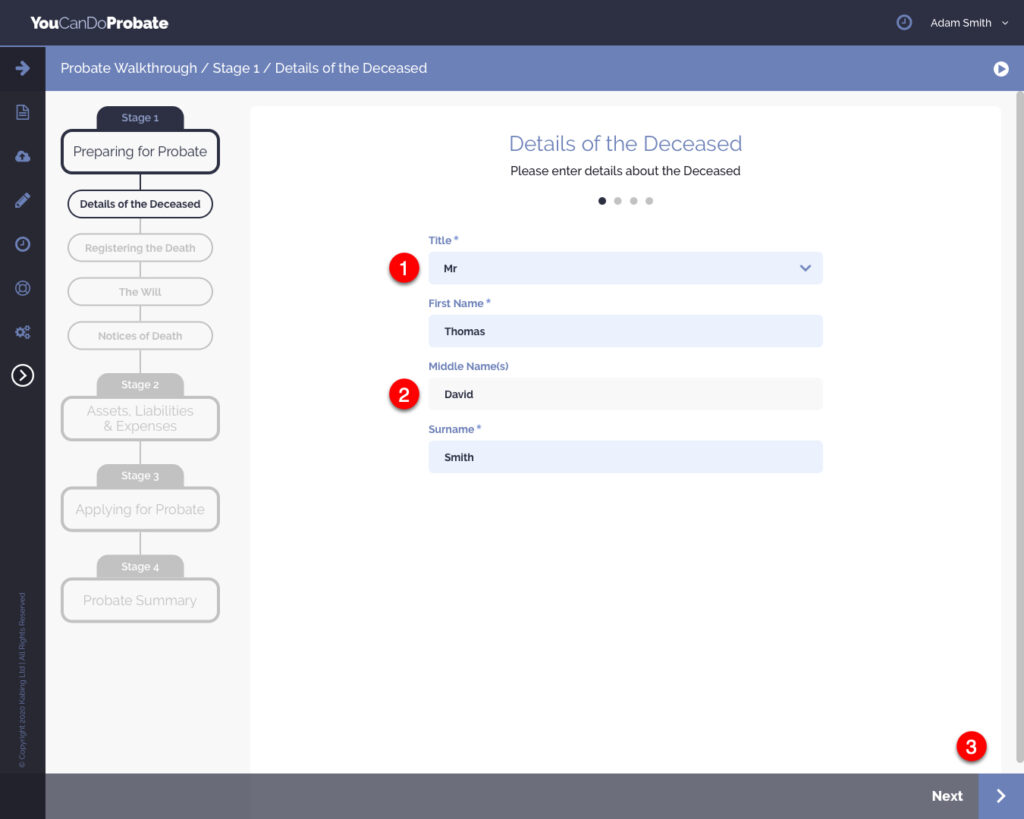
- Enter the details into the relevant question fields as requested on each page. If you do not know or have the answer to any question field, you can leave it blank and complete it when you have it. In a few instances, the answer to a question field will be required before proceeding to the next page, however you should be able to answer these questions at the time of which you are asked.
- If a question field is light grey, this information should be answered if it is relevant or can be answered. It is not necessarily needed for Probate and IHT application forms, however we recommend, if only for your final records, that where possible, you complete as much of the information as you can.
- Click on the ‘Next Arrow’ in the purple box, on the bottom right of your browser window when you have completed all of the question fields and are ready to move to the next page.
- Click on the ‘Back Arrow’ in the purple box, on the bottom left of your browser window if you need to return to the previous page.
- You can use the bullets to navigate through the pages of a section. A purple bullet shows the page(s) you have already visited. A black bullet is the page you are currently on. A grey bullet indicates the remaining pages still to complete. If you have not visited a page yet, you cannot proceed further than the next page in the bullet list.

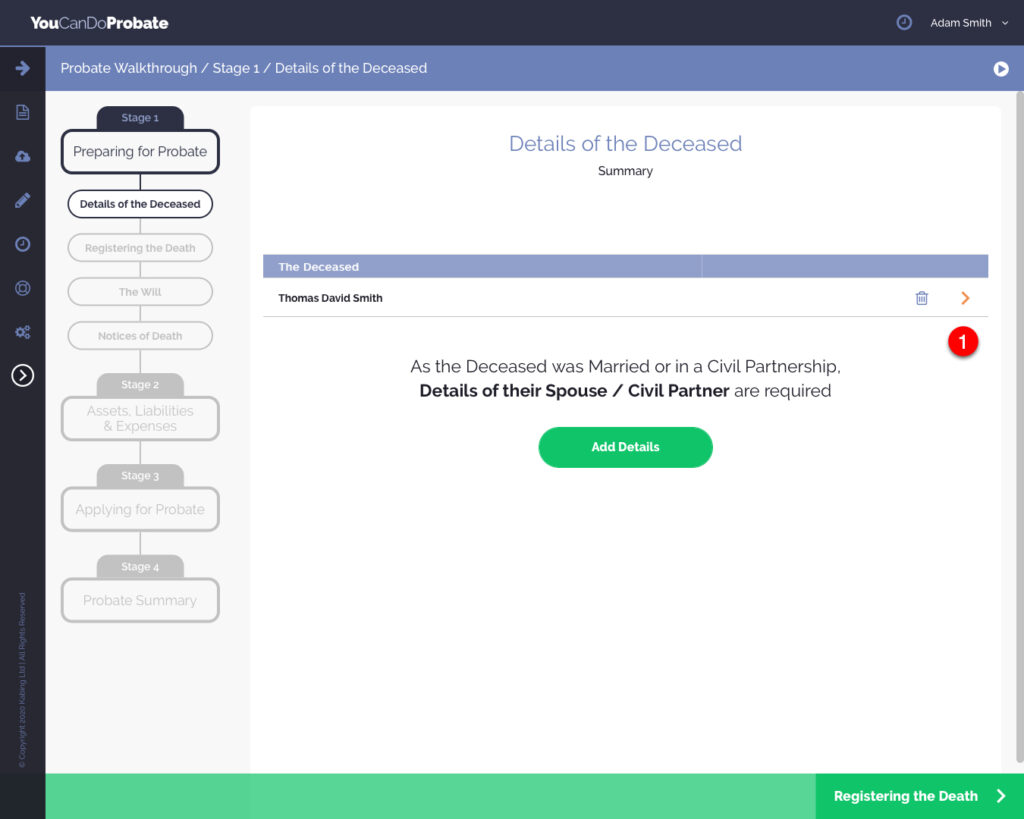
Once you have worked through each of the pages within a section, the information can now be viewed, edited or deleted from the section’s summary page.
- If the ‘Trash Can’ icon appears in a summary table, you will be able to delete all of the information you have added to that section or record. If you delete anything the data cannot be restored.
- Click the ‘Arrow’ icon to view or edit the information you have added.
- When the ‘Arrow’ Icon is purple, all of the necessary information has been completed and you will be able to assign the section as ‘complete’. This section will now display in green on the ‘Probate Walkthrough Menu’. All sections must be completed (displayed in green on the ‘Probate Walkthrough Menu’) in order to generate the Probate and IHT application forms.

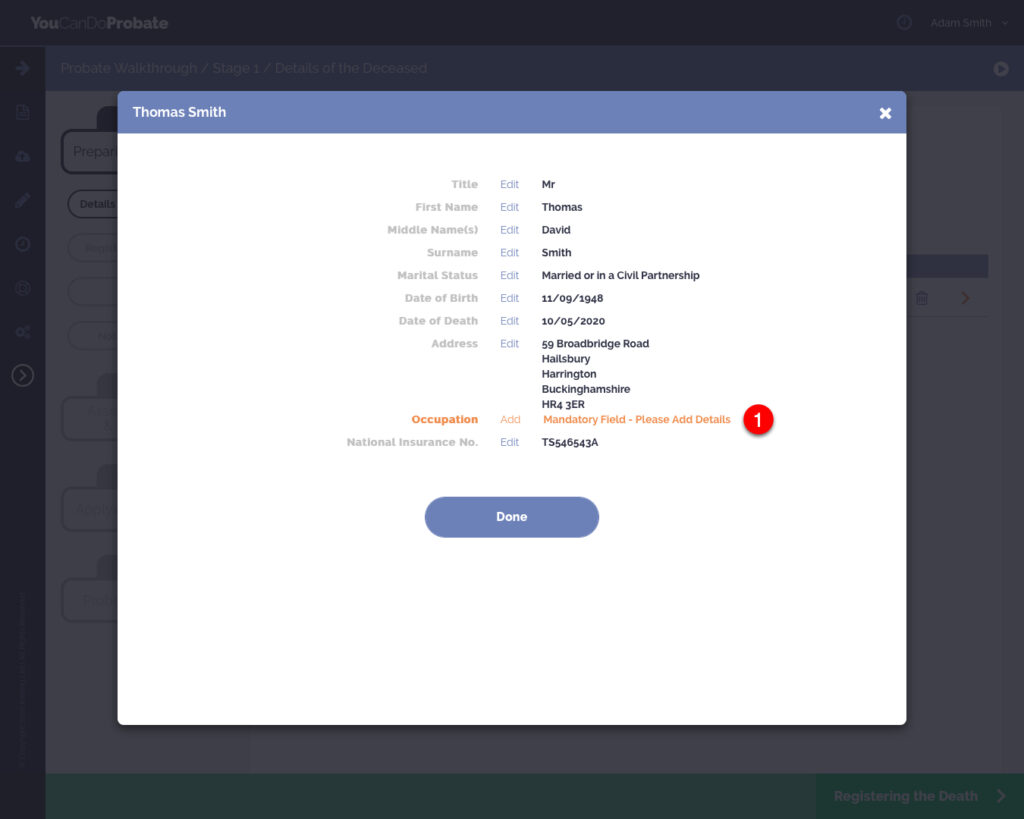
- When the ‘Arrow’ icon is orange, there is information that has not been completed, that is required for the Probate and IHT application forms. You can still proceed through the Probate Walkthrough. You will only be able to assign the section as ‘incomplete’. This section will now display in orange on the ‘Probate Walkthrough Menu’. You will need to return at a later point to complete the required information. All sections must be completed (displayed in green on the ‘Probate Walkthrough Menu’) in order to generate the Probate and IHT application forms.
- Any questions that have not been answered, and that are required for the Probate and IHT application forms will be displayed in orange. Click the orange ‘Add’ to enter the details once you have it to complete as required.
Registering the Death #
Useful Articles related to Registering the Death:
Registering the Death
The ‘Tell Us Once’ Service
Registered without using the ‘Tell Us Once’ service. #
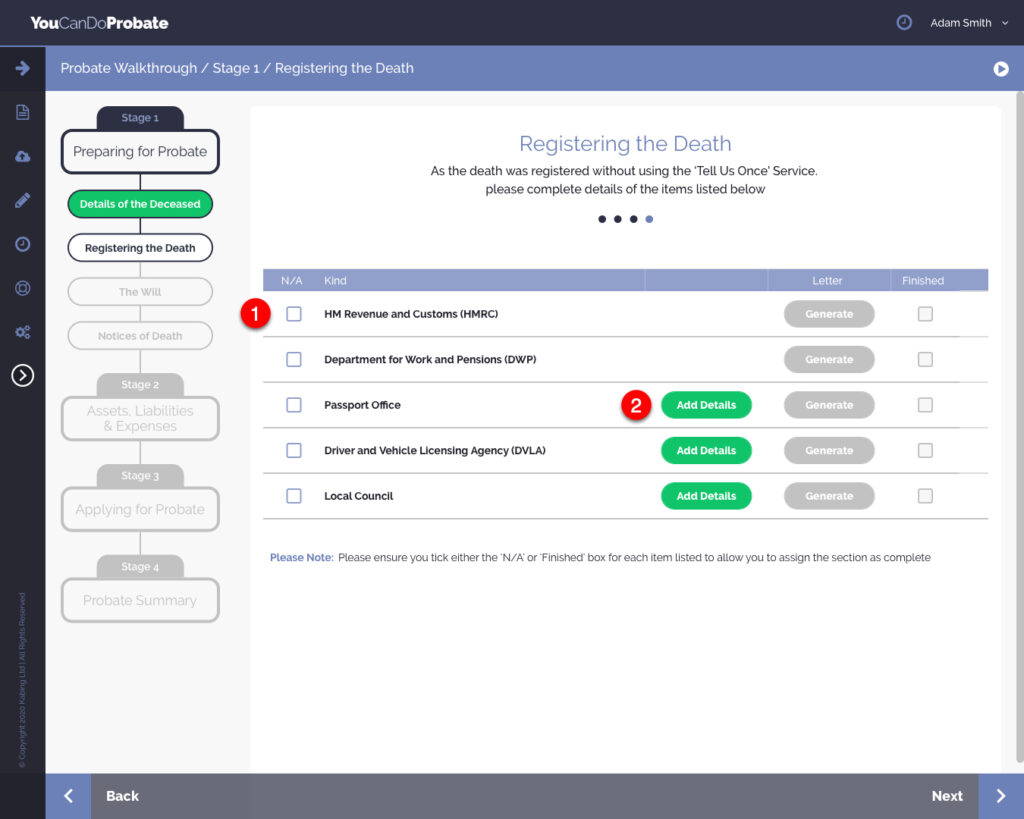
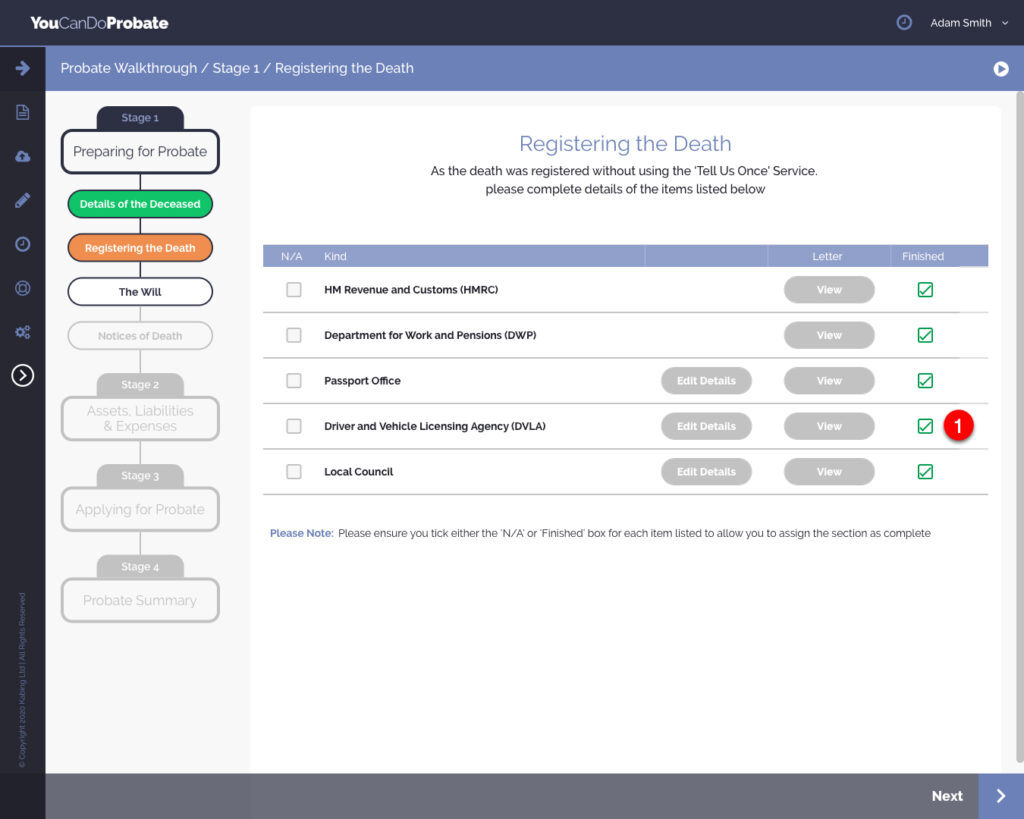
If you entered ‘No’ to “Did you use the ‘Tell Us Once’ service”, you will be provided with a facility to inform some of the various authorities about the death. This area will provide you with the completed letters or documents that you need to submit, ready to download and print, sign and post.
- If you do not need to notify one of the authority’s in the table, please tick the checkbox in the N/A (Not applicable) column before it.
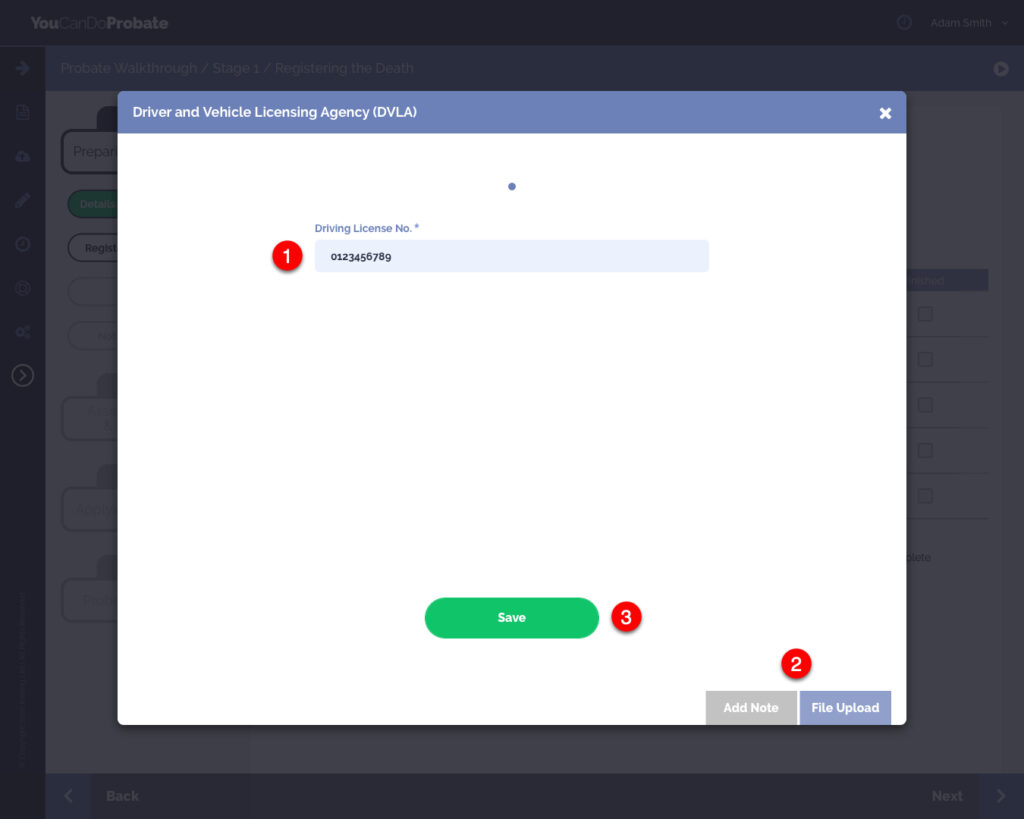
- If an authority requires some additional information, you will need to add this before a letter can be generated, please click ‘Add Details’.
- Enter the details into the relevant question fields as requested on each page(s) of the lighbox. If you do not know or have the answer to any question field, you can leave it blank and complete it when you have it.
- Quickly add a note or upload a file relevant to the record by clicking ‘Add Note’ or ‘File Upload’. For example, a scan of the driving license.
- Click the ‘Save’ button at the bottom of the lightbox. If your screen is small you may need to scroll to the bottom of the lightbox to see the button.
- Click the ‘Generate’ button to create a letter. Once completed, click the new ‘View’ button.
Please Note: Before you can generate and view any letters from the application, you will need to have entered the details of the Primary Executor (or Primary Applicant if there are no Executors applying or there is no Will) in ‘The Will’ section of Stage 1. Once this has been done, you can return to this section and generate the necessary letters.

- If the preview of the letter does not load click on ‘Click here to reload’.
- Check over the letter to make sure all the information is correct.
- Click the ‘Download’ button to download the letter. The letter is a Word document so that you will be able to open it and edit, should you want to make any changes or additions.
- Quickly access Letters and documents that you generate from the ‘Letters & Documents’ section in the ‘Fly-Out’ Menu from anywhere in the application.

- Tick the green checkbox in the ‘finished’ column for each authority you have notified. You will only be able to check this box if the required information for the authority has been completed. This will disable the ability to edit any of the details. To edit, simply uncheck.
Please Note: Please ensure you tick either the ‘N/A’ or ‘Finished’ box for each item listed to allow you to assign the section as complete.
The Will #
How to add an Executor #
Useful Articles related to The Will:
A guide to the Will
How to find a Will
What if I can only find a copy of the Will?
Please Note: You must list all of the Executors appointed on the Will, even if they cannot act with you because they died before / or after the date the deceased passed, or, they may not wish to, or lack the capacity to, act with you.
- If there are no Executors applying, then you will need to complete details of the ‘Applicants’. The process of this is the same as that of adding an Executor, as listed below. You will still be required to add all of the Executors appointed on the Will, even though they are not applying.
Useful Articles:
What if an Executor cannot or does not wish to act
What if there are no Executors able to apply?
- If there are no Executors because there is no Will, you need to complete details of the ‘Applicants’. This will happen after you have completed the Intestacy Walkthrough. The process of this is the same as that of adding an Executor, as listed below.
Useful Articles:
Rules of Intestacy
Who can apply for Probate if there is No Will?
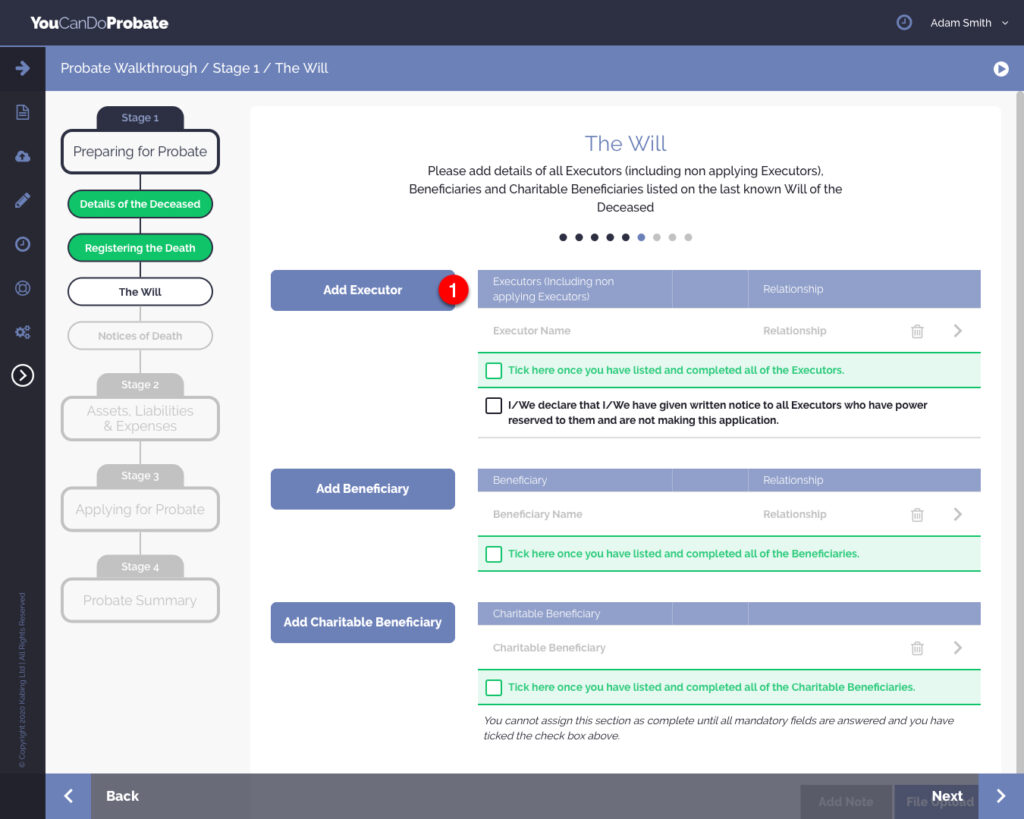
- Click on the ‘Add Executor’ button
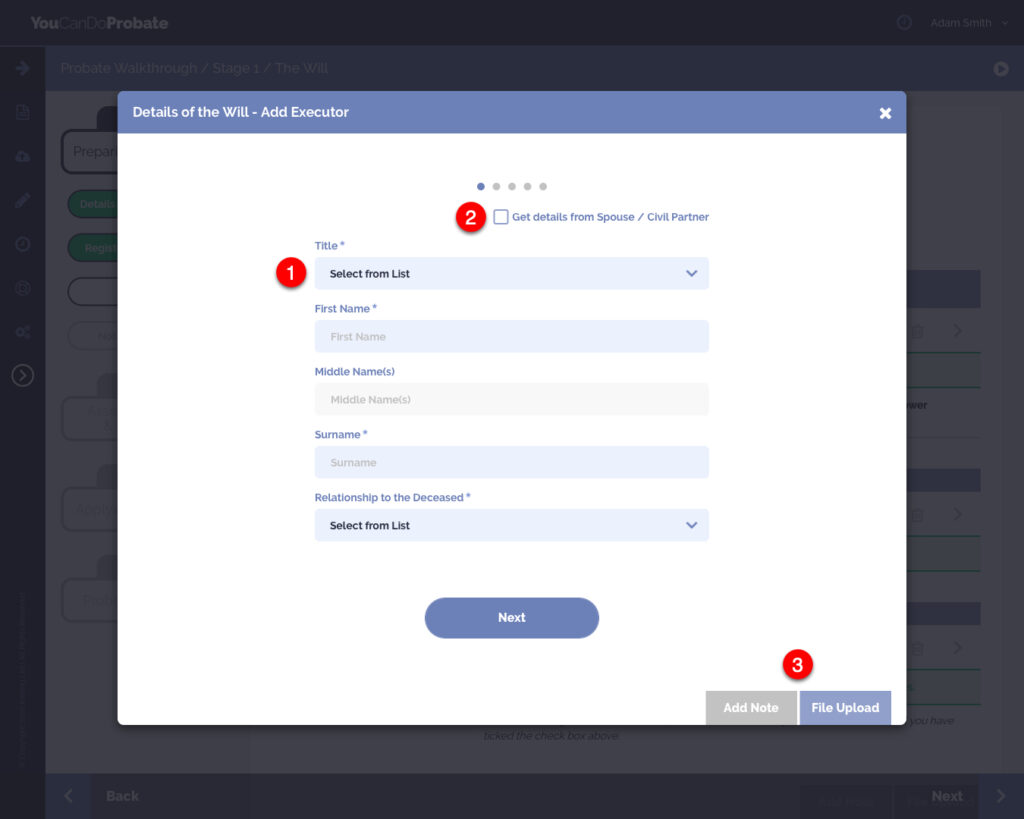
- Enter the details into the relevant question fields as requested on each page(s) of the lightbox. If you do not know or have the answer to any question field, you can leave it blank and complete it when you have it.
- Tick the checkbox to automatically complete the fields from the details of a Spouse / Civil Partner or Pre-deceased Spouse / Civil Partner previously entered in ‘Details of the Deceased’ section.
- If you need to edit the details you must do it from the ‘Details of the Deceased’ section.
- Quickly add a note or upload a file relevant to the Executor by clicking ‘Add Note’ or ‘File Upload’.
- The Primary Executor is the main Executor and who will send and receive all correspondence relating to the Grant of Probate and the administration of the estate.

- If the Executor is also a Beneficiary you can enter the details at this point and the Executor will be listed in both the Executor and Beneficiary tables.

- Click the ‘Arrow’ icon to view or edit the Executors information you have added.
- When the ‘Arrow’ Icon is purple, all of the necessary information has been completed.
- When the ‘Arrow’ icon is orange, there is information that has not been completed, that is required for the Probate and IHT application forms, or for the Beneficiary Schedule. Click in the orange ‘Arrow’ icon to see the questions that have not been answered, these will be displayed in orange. Click the orange ‘Add’ to enter the details once you have them to complete as required.
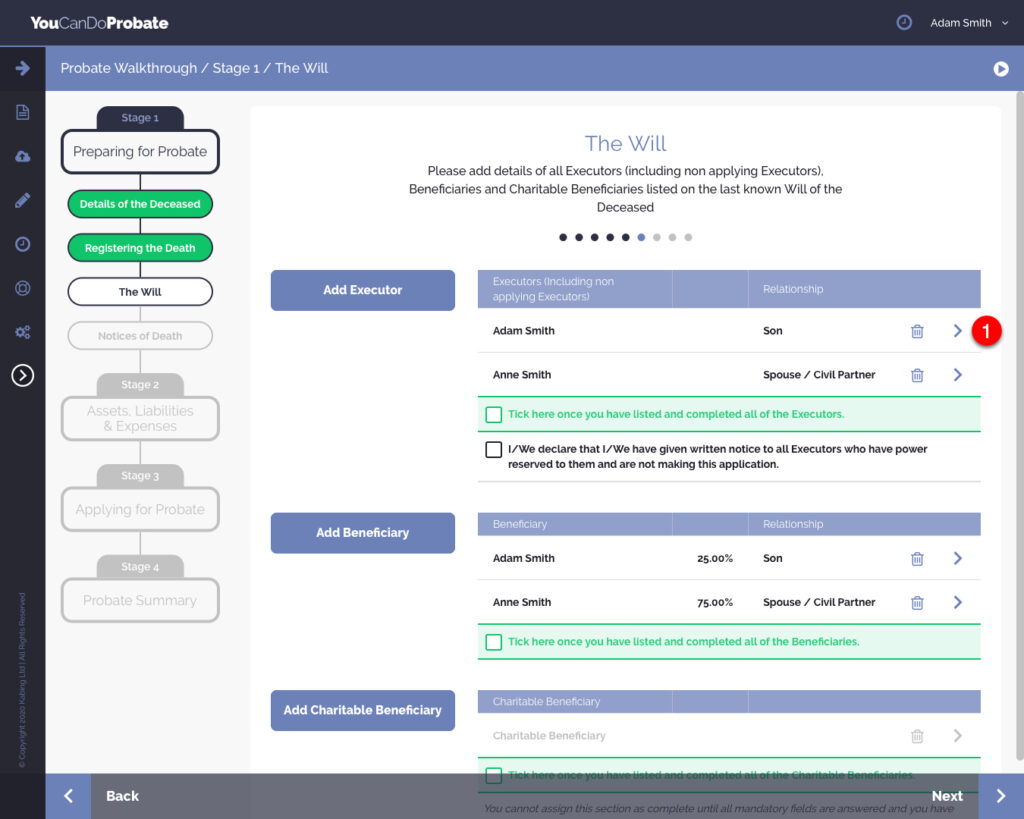
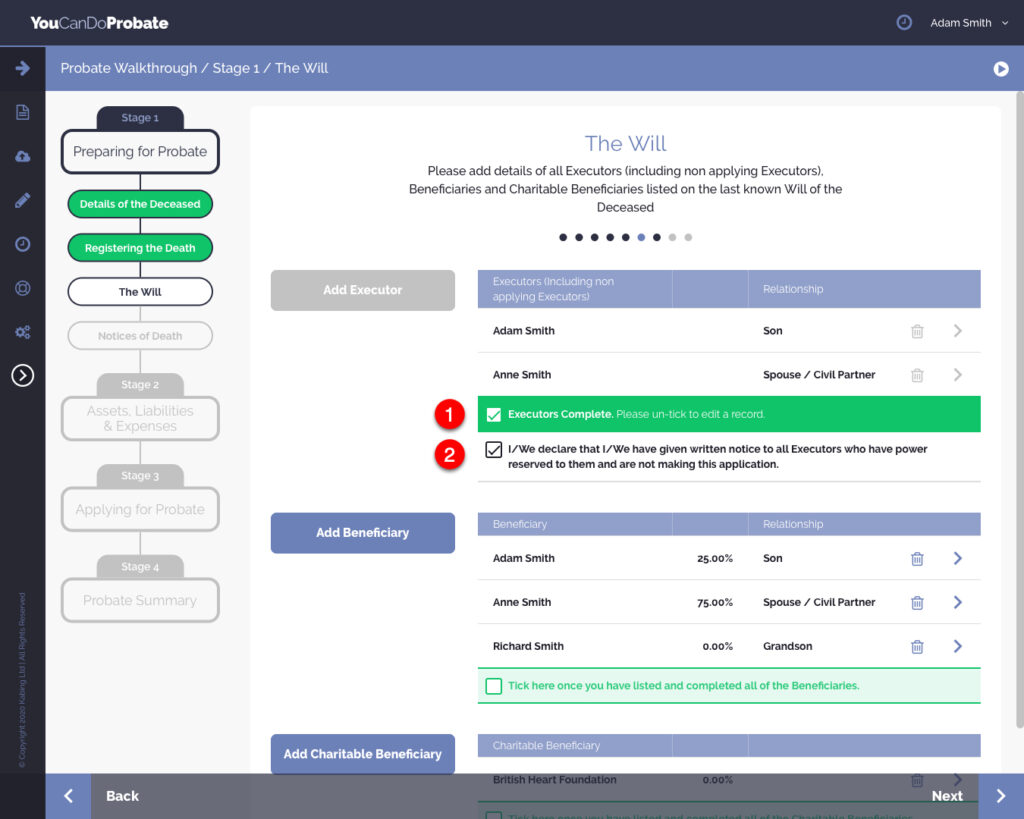
- Once you have listed all Executors, including any Executors that are not applying with you tick the green checkbox. You will only be able to tick this box if the required information for all of the Executors has been completed. This will disable the ability to add an Executor or edit any of the details of a listed Executor. To add another, or edit an Executors details, simply uncheck this box.
- Tick the black declaration checkbox that you, and any other applying Executors, declare that you have given written notice to all Executors who have power reserved to them and are not making this application.
Please Note: You cannot assign this section as complete you have ticked the checkboxes as referenced in steps 1 and 2 above.
How to add a Beneficiary or Charitable Beneficiary #
Useful Articles:
What happens if one of the Beneficiary listed on the Will has died?
Assets passing to a Charitable Beneficiary
- Click on the ‘Add Beneficiary’ / ‘Add Charitable Beneficiary’ button
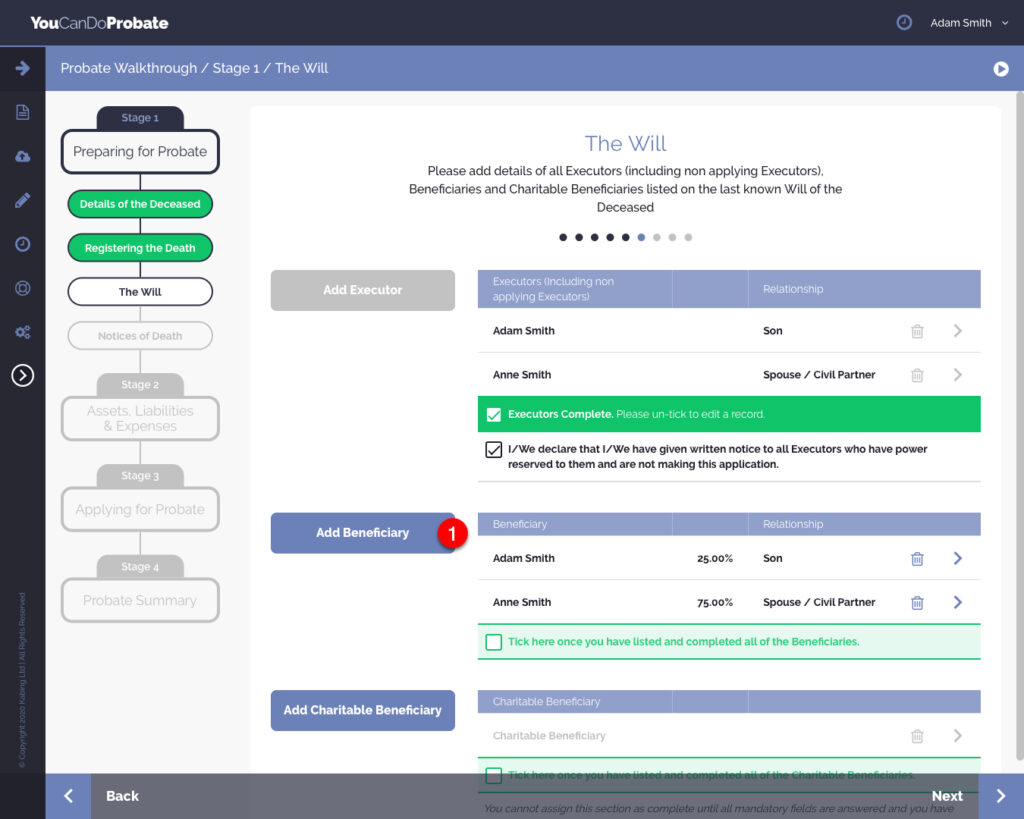
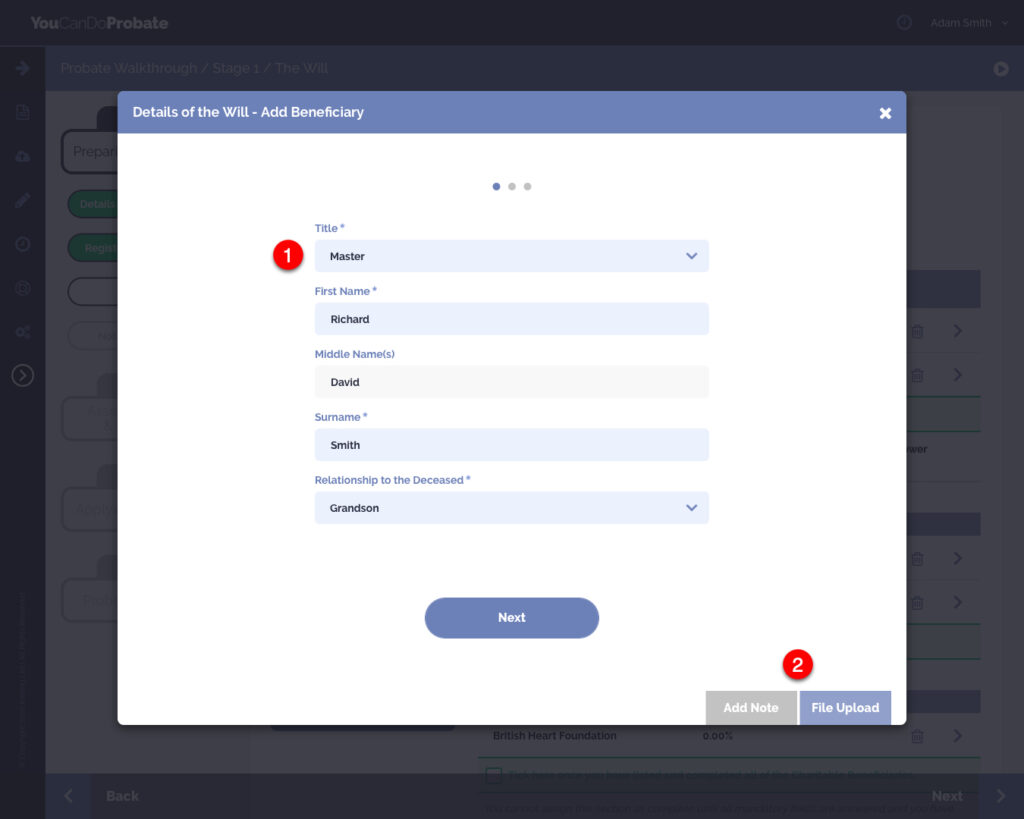
- Enter the details into the relevant question fields as requested on each page(s) of the lightbox. If you do not know or have the answer to any question field, you can leave it blank and complete it when you have it. Details of any specific monetary entitlement bequests listed in the Will, and any specific percentage of the residual estate value bequested will be added here.
- Quickly add a note or upload a file relevant to the Beneficiary by clicking ‘Add Note’ or ‘File Upload’.
- If an asset has been specifically willed to a person, list the beneficiary without any monetary entitlement or residual value percentage. You will then assign the willed asset to the beneficiary when you record the asset in ‘Stage 2 > Asset & Liabilities’.
- If the Beneficiary is also an Executor that you have not already listed, you can enter the details at this point and the Beneficiary will be listed in both the Executor and Beneficiary tables.

- Click the ‘Arrow’ icon to view or edit the Beneficiary’s information you have added.
- When the ‘Arrow’ Icon is purple, all of the necessary information has been completed.
- When the ‘Arrow’ icon is orange, there is information that has not been completed, that is required for the Probate and IHT application forms, or for the Beneficiary Schedule. Click in the orange ‘Arrow’ icon to see the questions that have not been answered, these will be displayed in orange. Click the orange ‘Add’ to enter the details once you have them to complete as required.

- Once you have listed all Beneficiaries, you will only be able to check this box if the required information for all of the Beneficiaries has been completed. This will disable the ability to add a Beneficiary or edit any of the details of a listed Beneficiary. To add another, or edit a Beneficiary’s details, simply uncheck this box.
Please Note: You cannot assign this section as complete you have ticked the checkbox as referenced in steps 2.

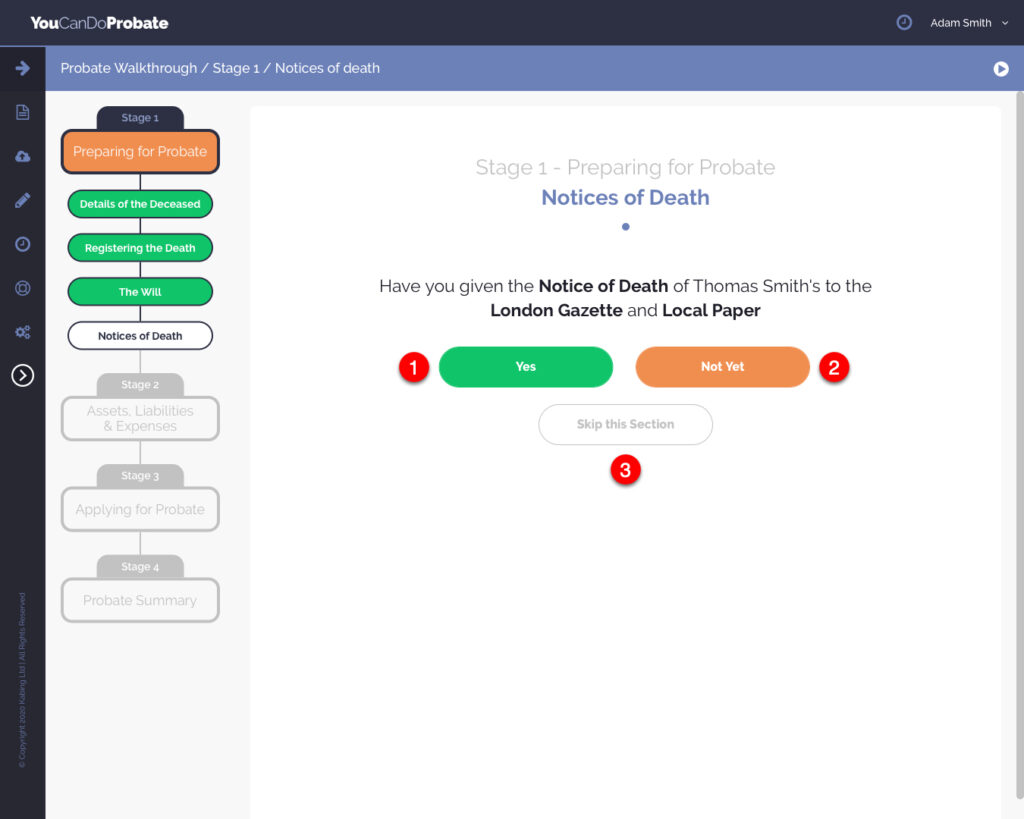
Notices of Death #
Useful Article
How to place a Notice of Death in The Gazette
- If you have given Notice and placed an advert, answer ‘Yes’. This section can now be assigned as complete. Once you receive the Grant of Probate, You should wait 2 months and one day from the date you gave notice, before distributing the estate, to ensure no one responds to the notice and advert.
- If you haven’t had chance to give Notice and place an advert, answer ‘Not Yet’. You will need to return to this section to change your answer to ‘Yes’ once you have done so. The section will be assigned as ‘incomplete’. This section will now display in orange on the ‘Probate Walkthrough Menu’. All sections must be completed (displayed in green on the ‘Probate Walkthrough Menu’) in order to generate the Probate and IHT application forms.
- If you do not wish to given Notice and place an advert, answer ‘Skip this Section’. This will allow this section to be ignored by the Probate Walkthrough. This section will now display in grey on the ‘Probate Walkthrough Menu’. If you change your mind you can return to the section from the ‘Probate Walkthrough Menu’.
Assets & Liabilities #
Useful Articles related to Assets & Liabilities
Assets & Liabilities
Notifying Service Providers about the death
Valuing assets
Types of Ownership
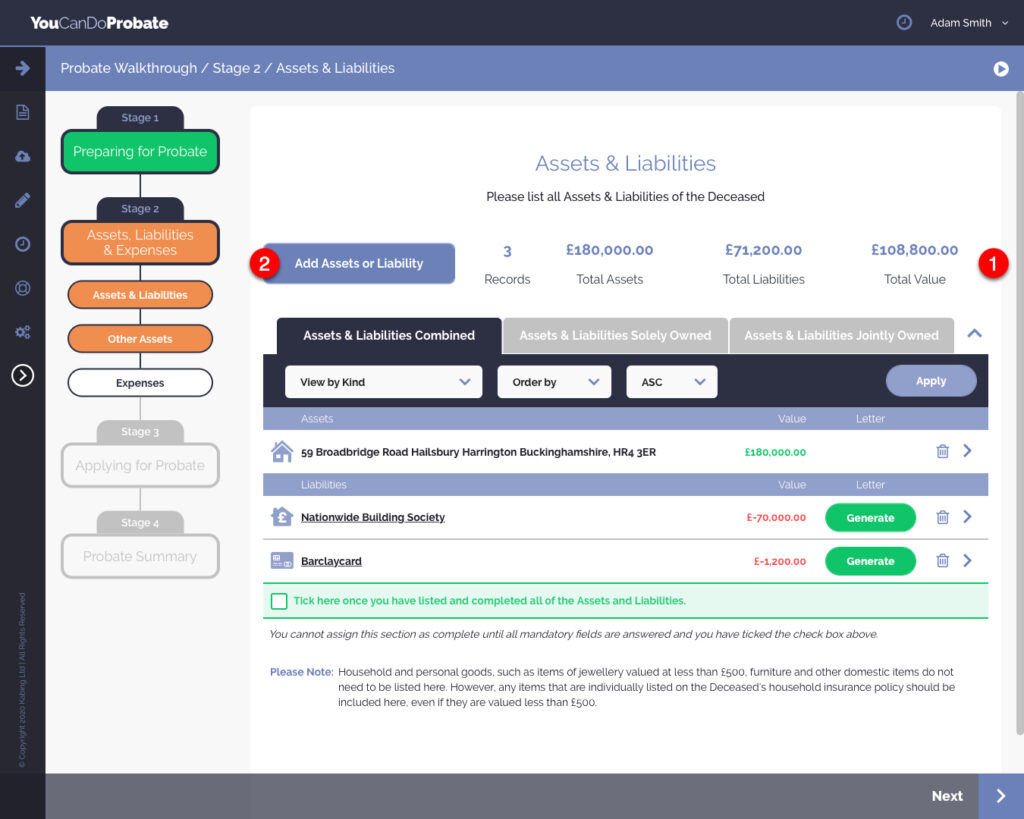
You need to enter all of the Assets & Liabilities that the person who has died had at the date of death, including any that are jointly owned.
Please Note: Household and personal goods, such as items of jewellery valued at less than £500, furniture and other domestic items do not need to be listed within the Assets & Liability records. However, any items that are individually listed on the Deceased’s household insurance policy should be included here, even if they are valued less than £500.
- The estate value automatically updates as you enter the assets and liabilities.
- Click on the ‘Add Asset or Liability’ button
- Select a type of asset or liability to list.

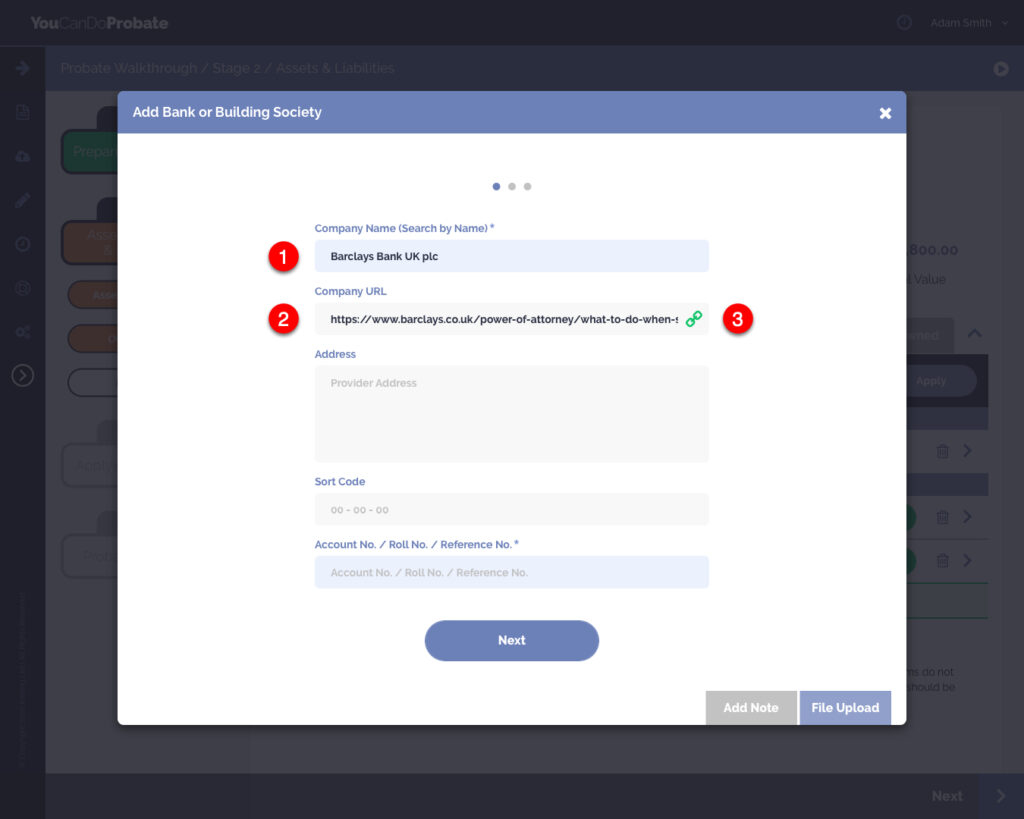
- If the asset or liability is provided by a company or service provider, for example a Bank or Building Society, Start to type the name of the company or service provider into the ‘Company Name’ field. If the company or service provider is listed in our ‘Company Search Database’, you will be presented with the company to select. If there is no record in our database, continue to manually enter the company name.
- If the company or service provider is listed in our ‘Company Search Database’, the application will automatically populate a URL link for the providers website, and in most cases, this will link to the correct bereavement page.
- If a URL is available, their website will inform you exactly how to contact them and provide details of their bereavement process. Not all company / service providers will require notification by written letter and may accept an email or have their own online or paper form.
- If there is no record in our database, manually enter the company’s URL for your convenience as a quick way to access their website.
- Click the green link icon to visit the website. The website will open in a new window.
- If the company or service provider requires you to send them a letter find the correct correspondence address, for their bereavement team, from their website.
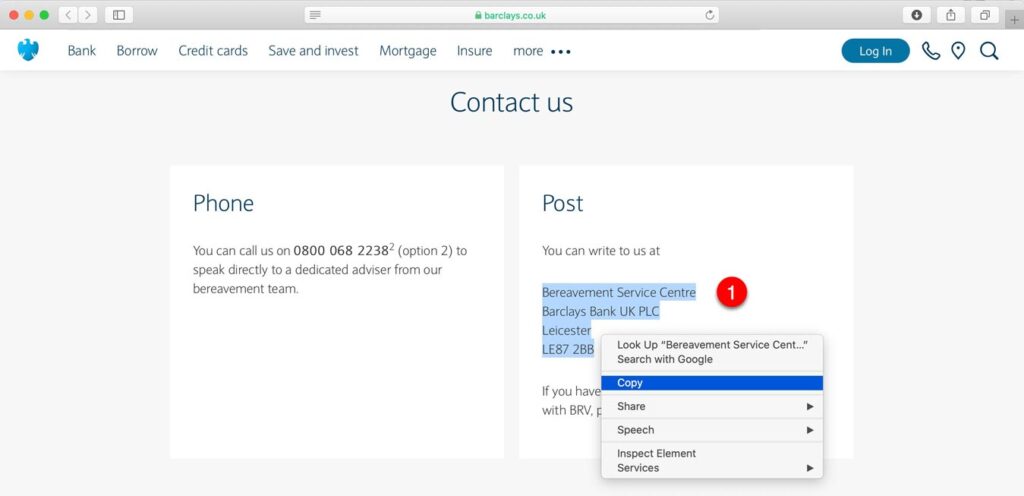
- Copy and paste the correct correspondence address it into the ‘Provider Address’ field.
Continue to enter the details into the relevant question fields. If you do not know or have the answer to any question field, you can leave it blank and complete it when you have it. You may need to wait for some of the necessary information to be supplied to you by the company or service provider.
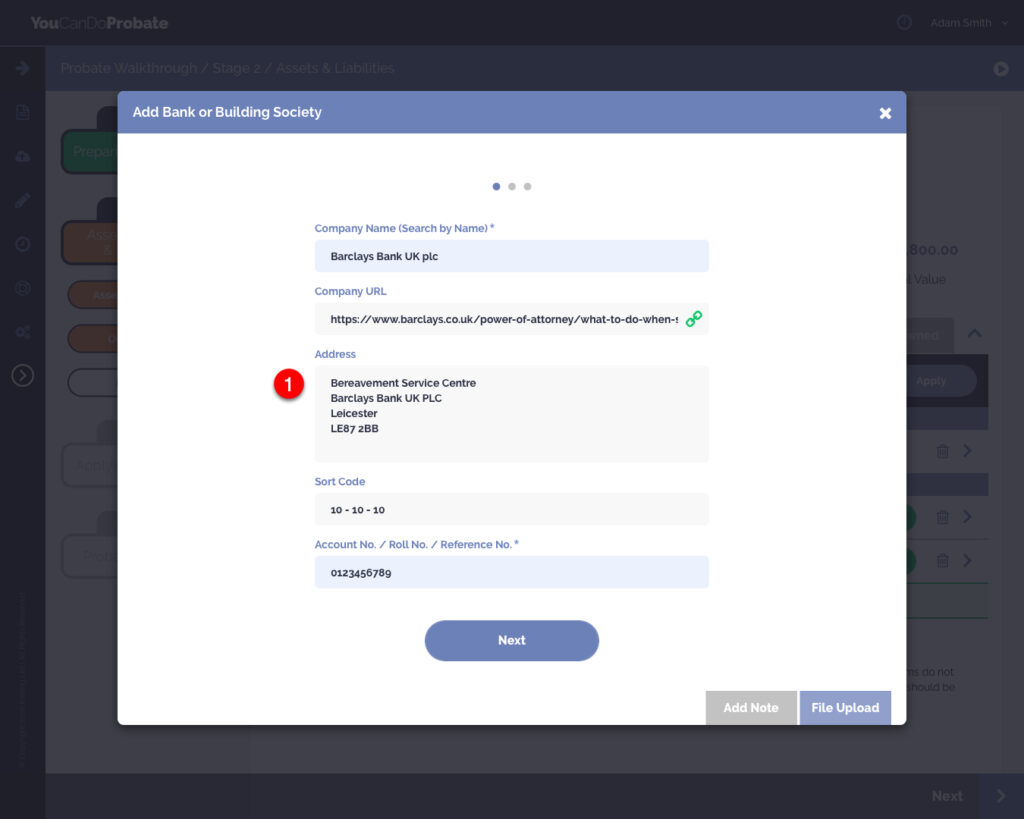
- Enter the total value of the asset or liability, not just the deceased share. For Inheritance Tax purposes, you have add the value of the asset or liability at the date the person died.
- Quickly add a note or upload a file relevant to the asset or liability by clicking ‘Add Note’ or ‘File Upload’. For example, scans of bank statements.
.Click the ‘Save’ button at the bottom of the lightbox. If your screen is small you may need to scroll to the bottom of the lightbox to see the button.

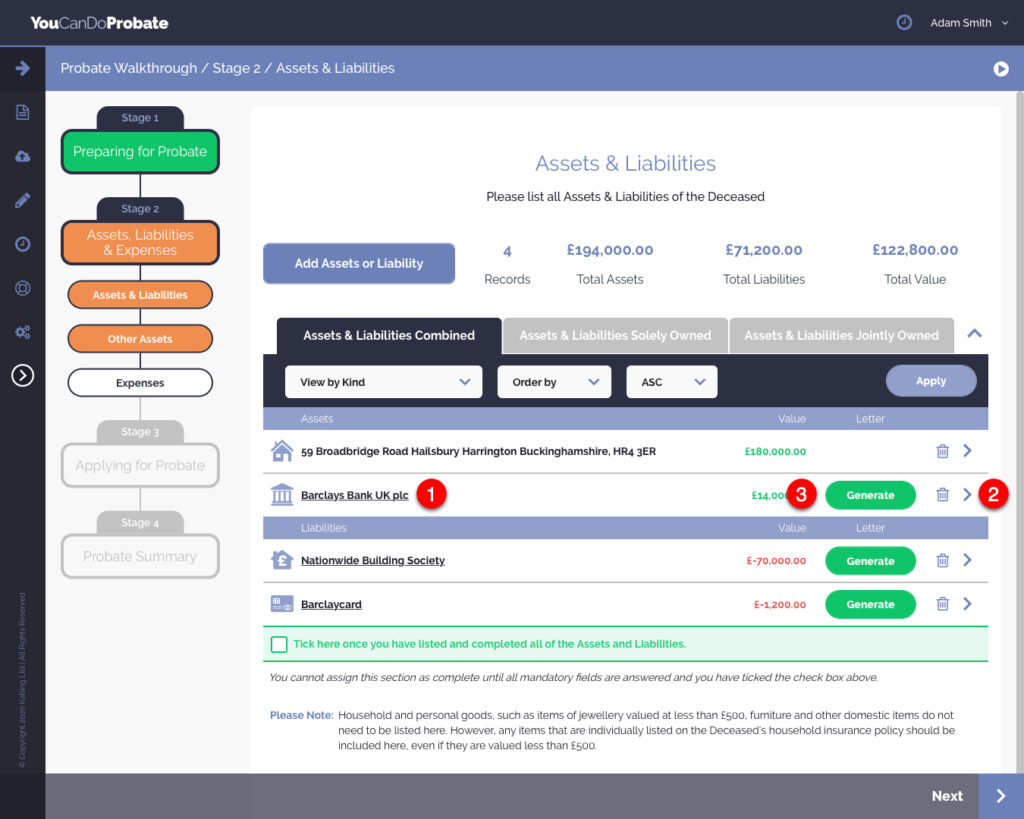
- Click the name of the company or service provider to visit their website.
- Click the ‘Arrow’ icon to view or edit the asset or liability’s information you have added.
- When the ‘Arrow’ Icon is purple, all of the necessary information has been completed.
- When the ‘Arrow’ icon is orange, there is information that has not been completed, that is required for the Probate and IHT application forms, or for the notification letter to be generated. Click in the orange ‘Arrow’ icon to see the questions that have not been answered, these will be displayed in orange. Click the orange ‘Add’ to enter the details once you have them to complete as required.
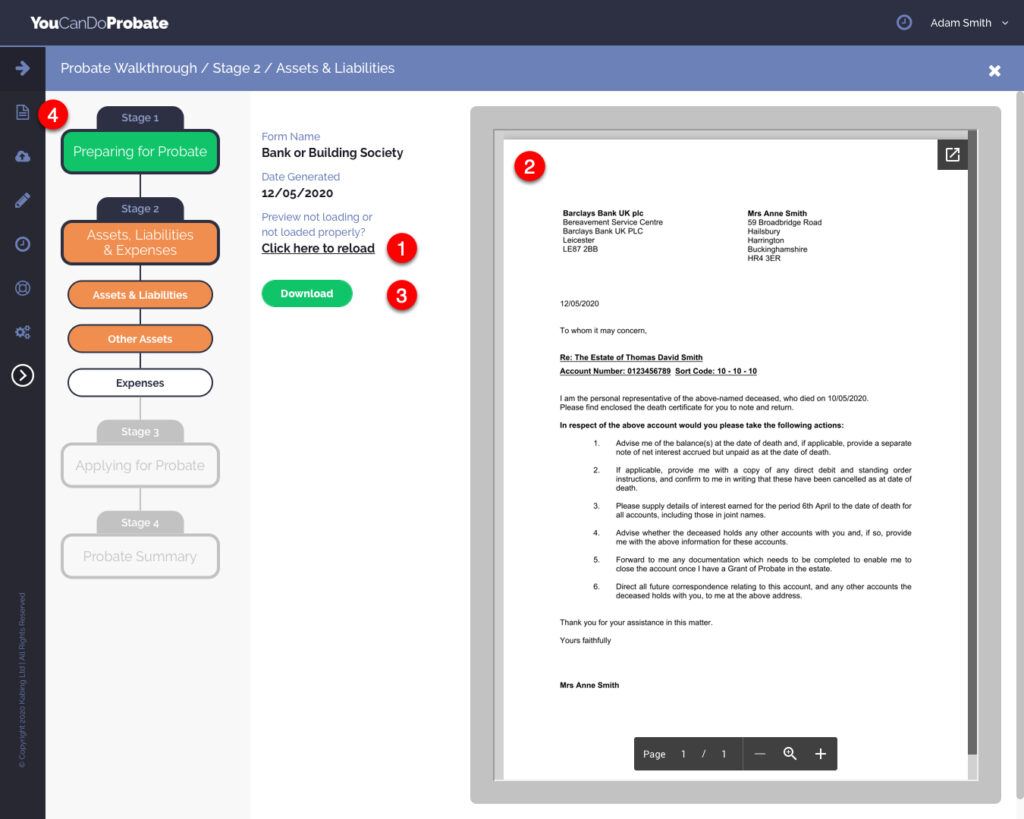
- Click the ‘Generate’ button to create a letter to notify the company or service provider of the death. Once completed, click the new ‘View’ button.
Please Note: Before you can generate and view any letters from the application, you will need to have entered the details of the Primary Executor (or Primary Applicant if there are no Executors applying or there is no Will) in ‘The Will’ section of Stage 1. Once this has been done, you can return to this section and generate the necessary letters.
- If the preview of the letter does not load click on ‘Click here to reload’.
- Check over the letter to make sure all the information is correct.
- Click the ‘Download’ button to download the letter. The letter is a Word document so that you will be able to open it and edit, should you want to make any changes or additions.
- Quickly access Letters and documents that you generate from the ‘Letters & Documents’ section in the ‘Fly-Out’ Menu from anywhere in the application.
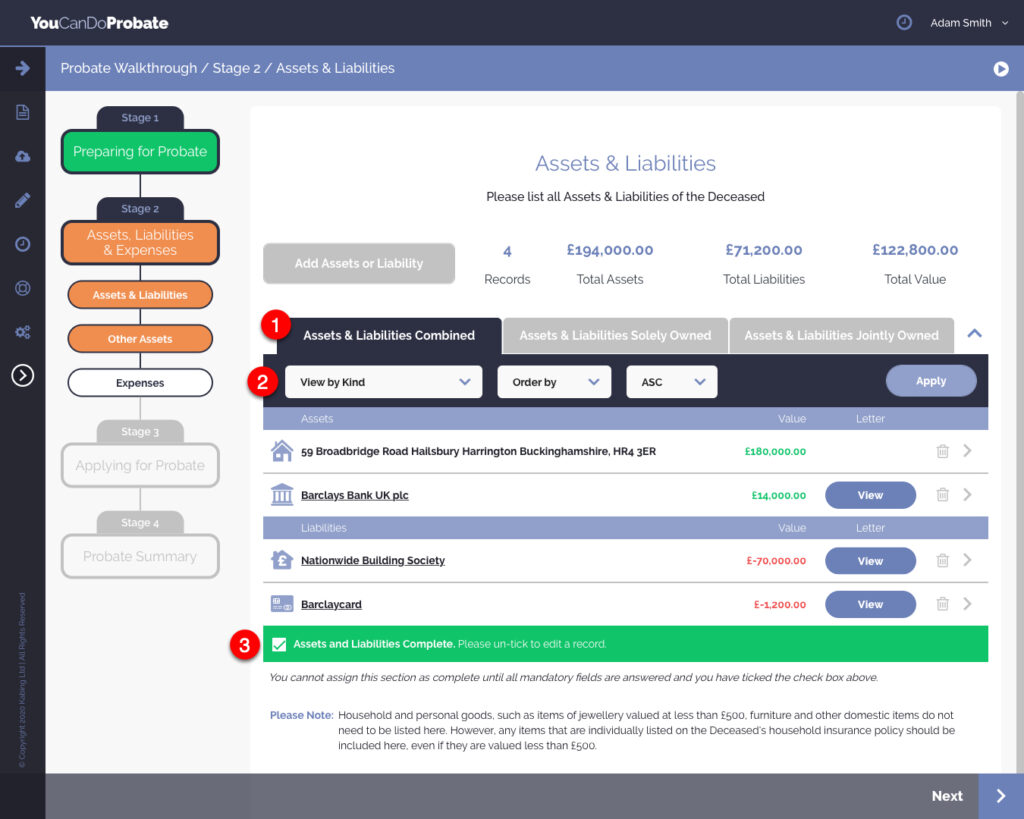
- View the asset and liability records by ownership type, by clicking between the three tabs at the top of the table.
- Filter the asset and liability records by type, order by name or value, and view as a ascending or descending list.
- Once you have listed all of the assets and liabilities please tick the green checkbox. You will only be able to check this box if the required information for all of each asset and liability has been completed. This will disable the ability to add an asset or liability, or edit any of the details of a record. To add another record, or edit an existing record, simply uncheck this box.
Please Note: You cannot assign this section as complete you have ticked the checkbox as referenced in step 3.
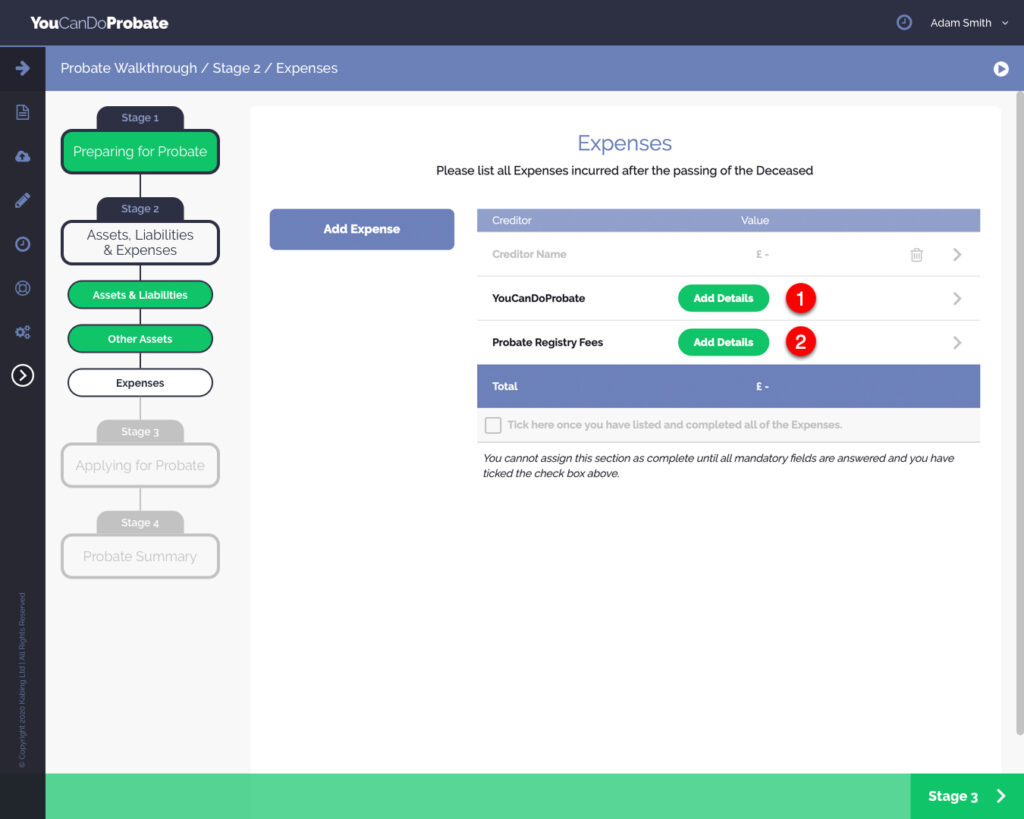
Expenses #
Useful Article
Expenses
Expenses cover any costs paid out either by an Executor, or directly from the estate, as a result of the death of the person who has died. These would usually include Funeral expenses, Probate or legal fees (including the cost for YouCanDoProbate and Probate Registry Fees).
- Enter the cost details of YouCanDoProbate, click the green ‘Add Details’ button. If you upgrade your account by purchasing the ‘Service Package Bolt-On’, do not forget to add this on to the value of your initial fee.
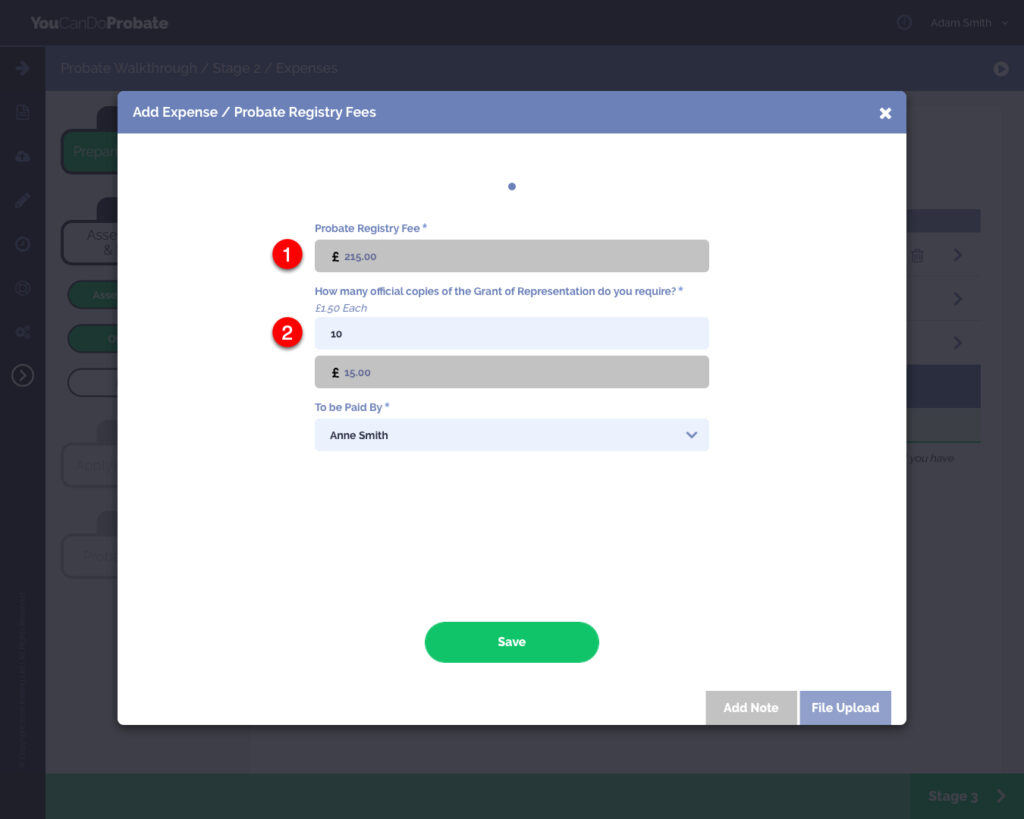
- Complete the Probate Registry Fees, click the green ‘Add Details’ button.
- The Probate Registry Fee is automatically calculated and is dependant on the value of the Estate. If the value of the estate is £5,000 or more the fee is set at £215.
- Enter the number of official copies of the Grant of Representation that you require. The cost is automatically calculated and will be added to the Probate Registry Fee once you click save.
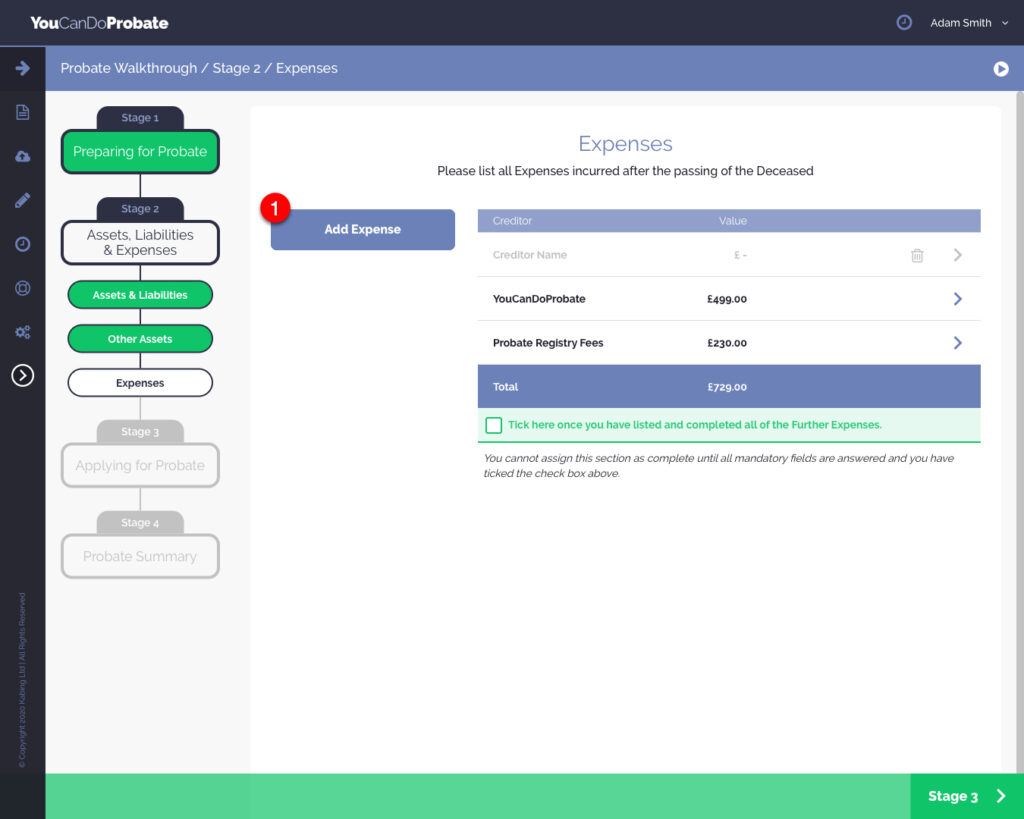
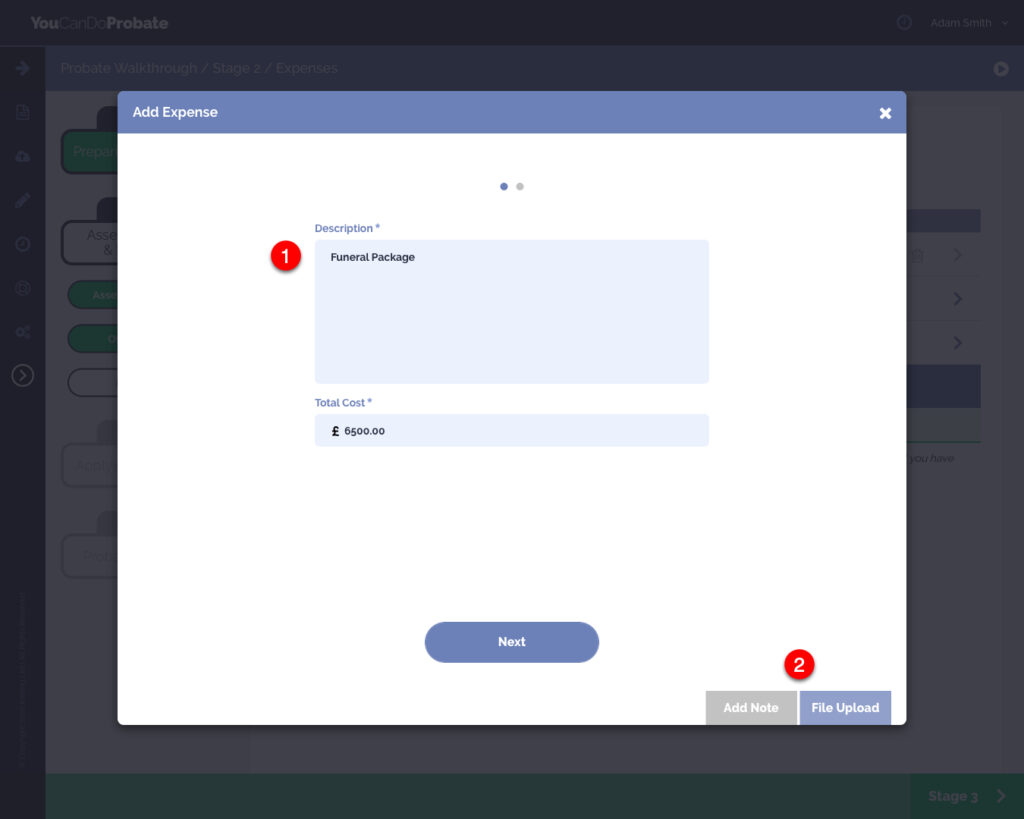
- Click the ‘Add Expense’ button
- Enter the details into the relevant question fields as requested on each page(s) of the lightbox. If you do not know or have the answer to any question field, you can leave it blank and complete it when you have it.
- Quickly add a note or upload a file relevant to the record by clicking ‘Add Note’ or ‘File Upload’. For example, a scan of a receipt or invoice.
- Click the ‘Save’ button at the bottom of the lightbox. If your screen is small you may need to scroll to the bottom of the lightbox to see the button.

- Click the ‘Arrow’ icon to view or edit the expense’s information you have added.
- When the ‘Arrow’ Icon is purple, all of the necessary information has been completed.
- When the ‘Arrow’ icon is orange, there is information that has not been completed, that is required for the Probate and IHT application forms. Click in the orange ‘Arrow’ icon to see the questions that have not been answered, these will be displayed in orange. Click the orange ‘Add’ to enter the details once you have them to complete as required.
- Once you have listed all of the expenses, please tick the green checkbox. You will only be able to check this box if the required information for all of each expense record has been completed. This will disable the ability to add an expense, or edit any of the details of a record. To add another record, or edit an existing record, simply uncheck this box.
Please Note: You cannot assign this section as complete you have ticked the checkbox as referenced in step 2.

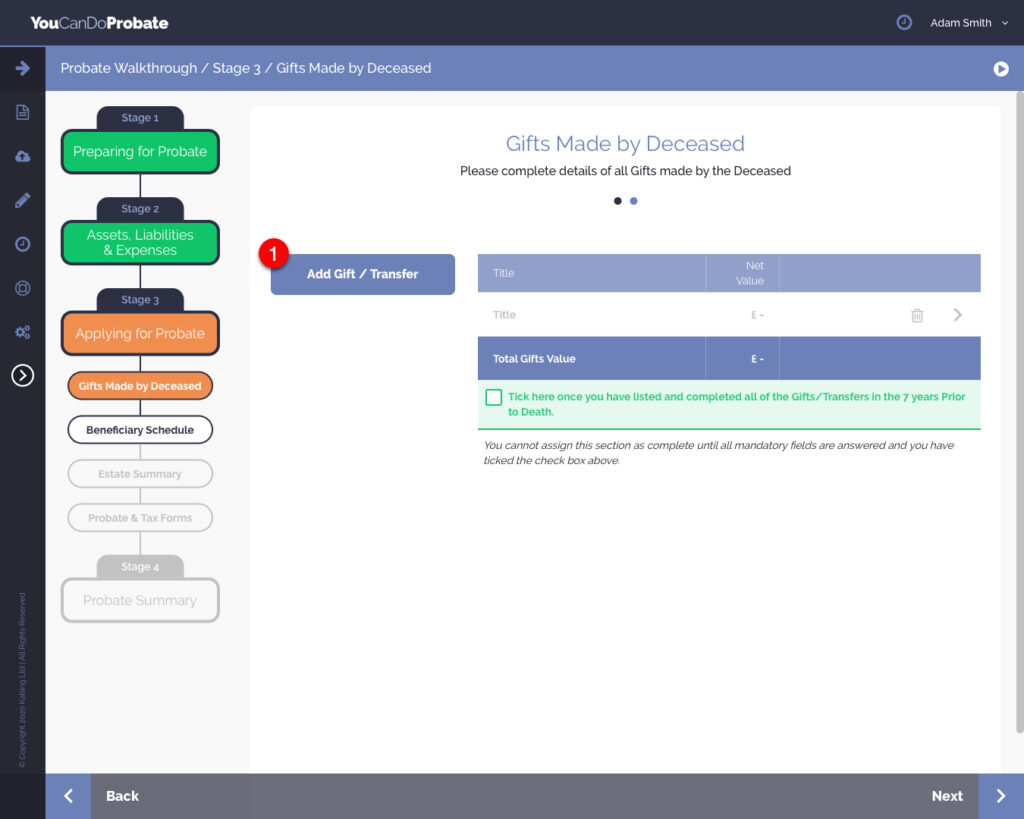
Gifts #
Useful Article
What are gifts made in the 7 years prior to death
You will only need to list any ‘Gifts (or Transfer Assets)’ totalling more than £3,000 per tax year, and/or ‘Gifts out of Income’ totalling more than £3,000 per tax year, in the 7 years Prior to Death to or for the benefit of another individual, or qualifying charity.
You can ignore any gifts made in consideration of Marriage or Civil Partnership within the limits of; £5,000 if the Deceased was a Parent or Step-Parent of one of the parties to the Marriage or Civil Partnership. £2,500 if the Deceased was a Grandparent or more remote relative of one of the parties to the Marriage or Civil Partnership. £1,000 in any other case.
Gifts out of income should have formed part of the deceased’s normal expenditure, made out of income, leaving the Deceased with sufficient income to maintain their normal standard of living. ‘Normal expenditure’ means that the payments were a regular part of the deceased’s expenditure.
- Click the ‘Add Gift / Transfer’ button
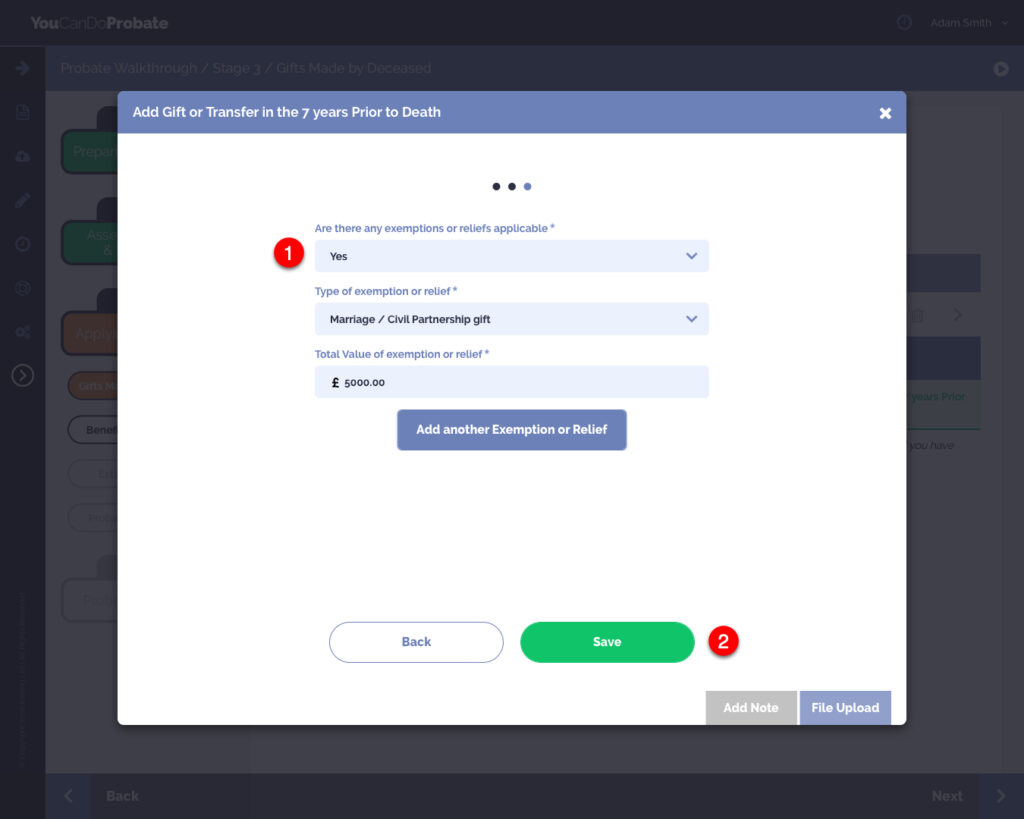
- Enter the details into the relevant question fields as requested on each page(s) of the lightbox. If you do not know or have the answer to any question field, you can leave it blank and complete it when you have it.
- Quickly add a note or upload a file relevant to the record by clicking ‘Add Note’ or ‘File Upload’.

- List if there was an applicable exemption, and the value that can be deducted from the total value of the gift or transfer. This deduction will be taken off the gifts value, when you save the record.
- Click the ‘Save’ button at the bottom of the lightbox. If your screen is small you may need to scroll to the bottom of the lightbox to see the button.
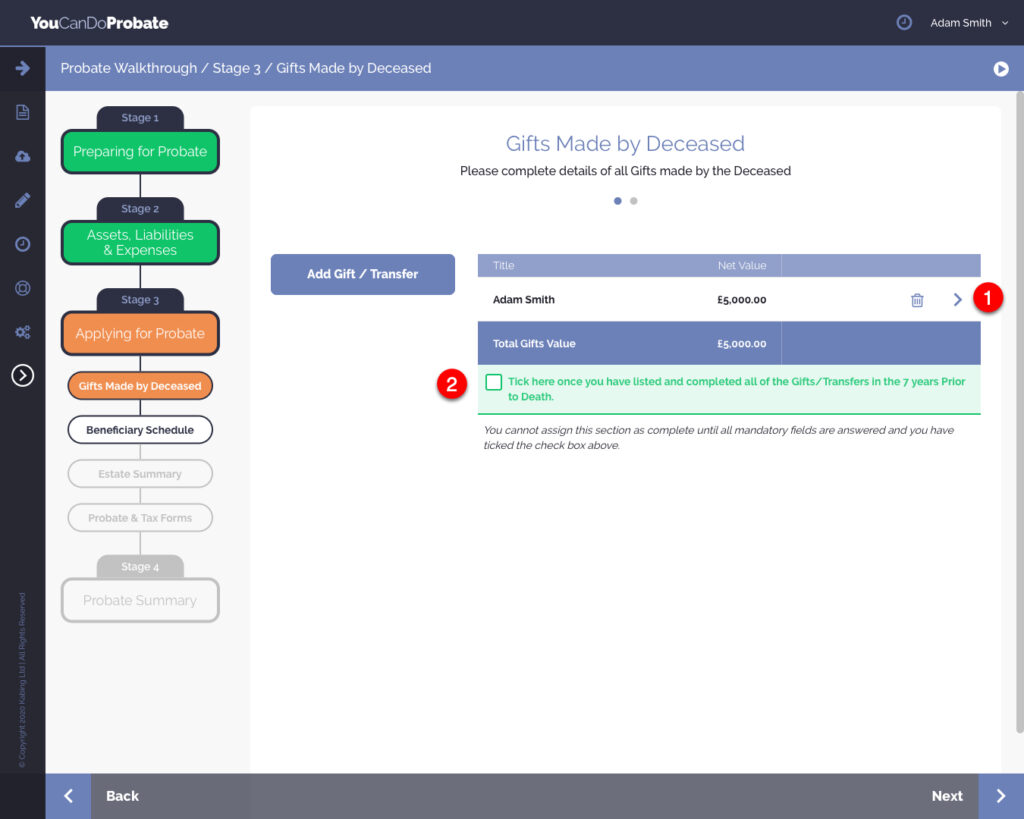
- Click the ‘Arrow’ icon to view or edit the gift/transfer’s information you have added.
- When the ‘Arrow’ Icon is purple, all of the necessary information has been completed.
- When the ‘Arrow’ icon is orange, there is information that has not been completed, that is required for the Probate and IHT application forms. Click in the orange ‘Arrow’ icon to see the questions that have not been answered, these will be displayed in orange. Click the orange ‘Add’ to enter the details once you have them to complete as required.
- Once you have listed all of the gifts, please tick the green checkbox. You will only be able to check this box if the required information for each gift record has been completed. This will disable the ability to add a gift, or edit any of the details of a record. To add another record, or edit an existing record, simply uncheck this box.
Please Note: You cannot assign this section as complete you have ticked the checkbox as referenced in step 2.
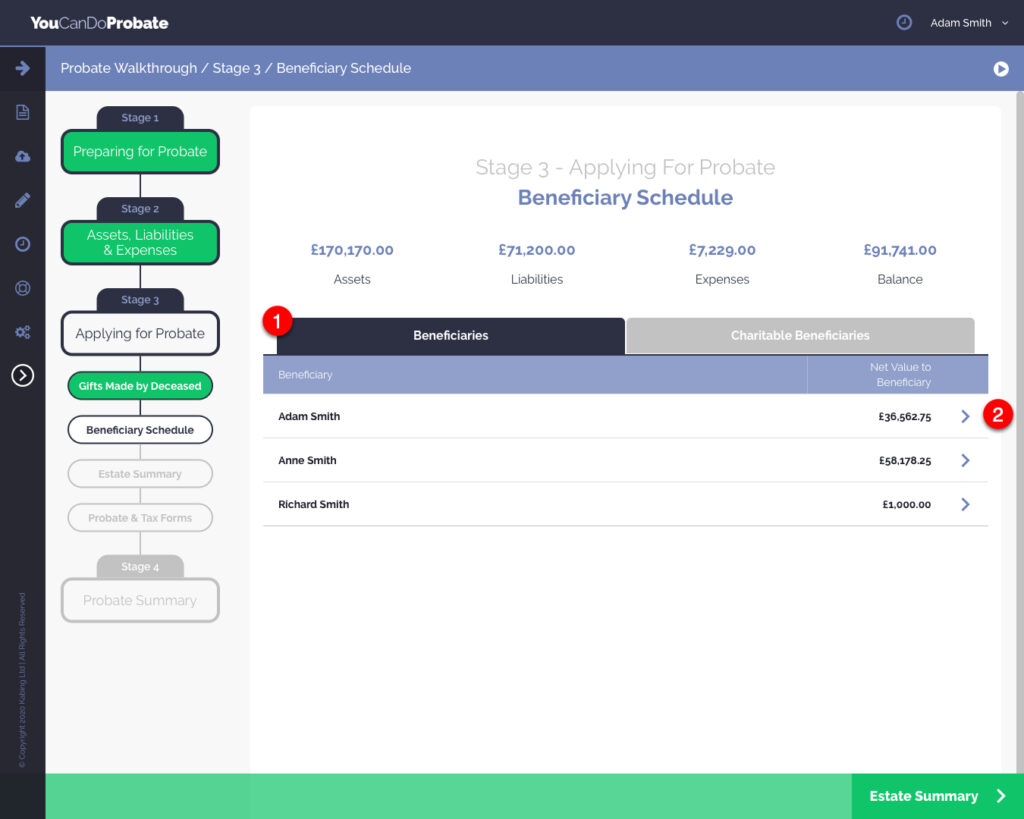
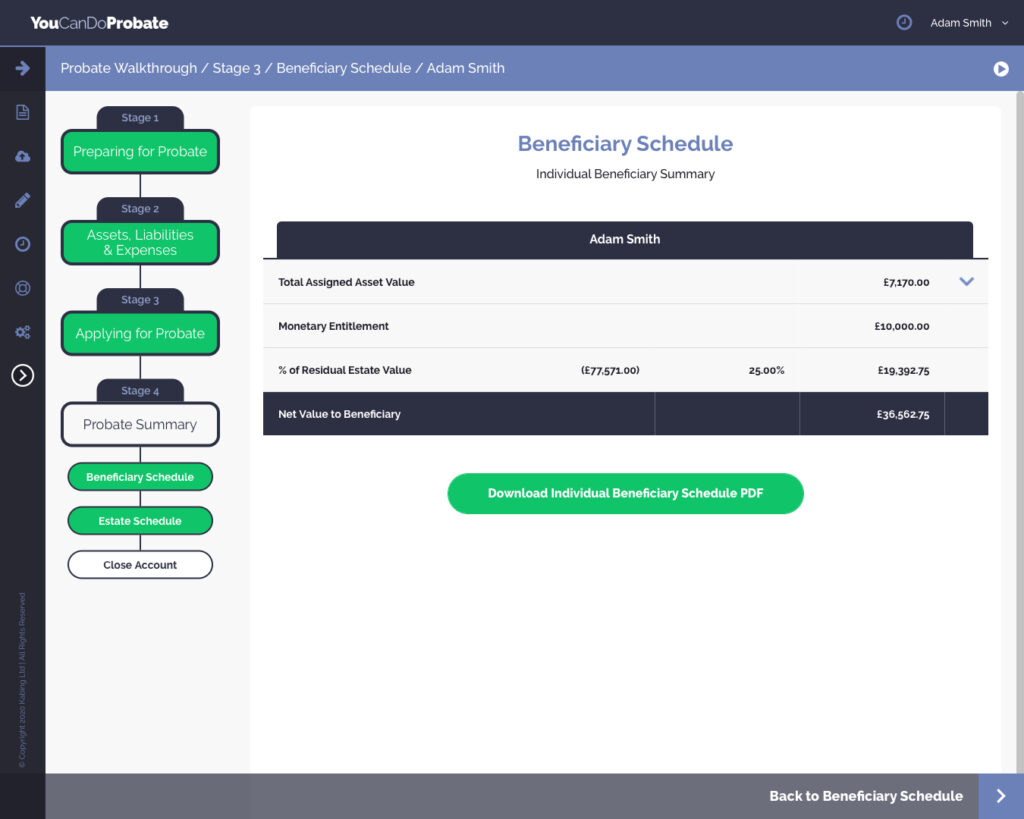
Beneficiary Schedule #
The Beneficiary Schedule (or Intestacy Schedule if there is no Will) provides a detailed entitlement of what each Beneficiary is due, based on the estate value at the date of death.
- Click on the tabs at the top of the schedule table to view either Beneficiaries or Charitable Beneficiaries.
- Click on the ‘Purple Arrow’ icon next to a Beneficiary to view further details of an individual Beneficiary.
- Click on the ‘Purple Down Arrow’ icon to view details of ‘Total Assigned Asset Value’.
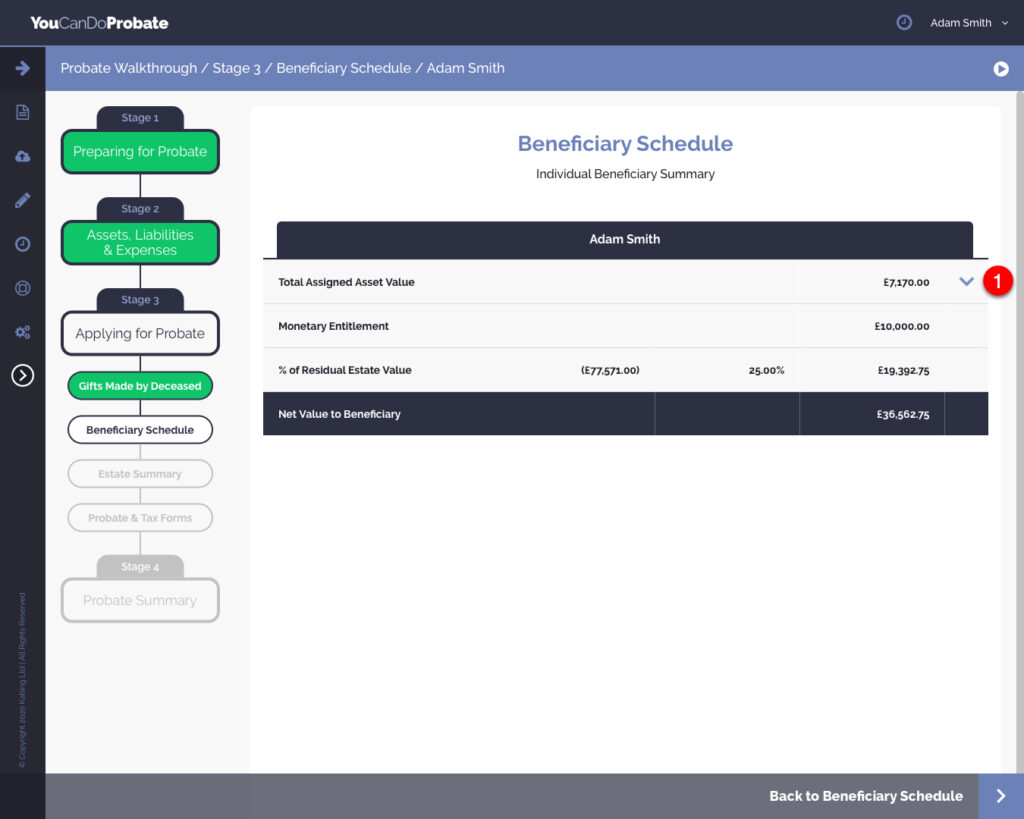
- Each specifically willed asset, bequested to an individual Beneficiary is listed.
- To exit the individual Beneficiary Schedule, click on the ‘Back to Beneficiary Schedule Arrow’ in the purple box, on the bottom right of your browser window.

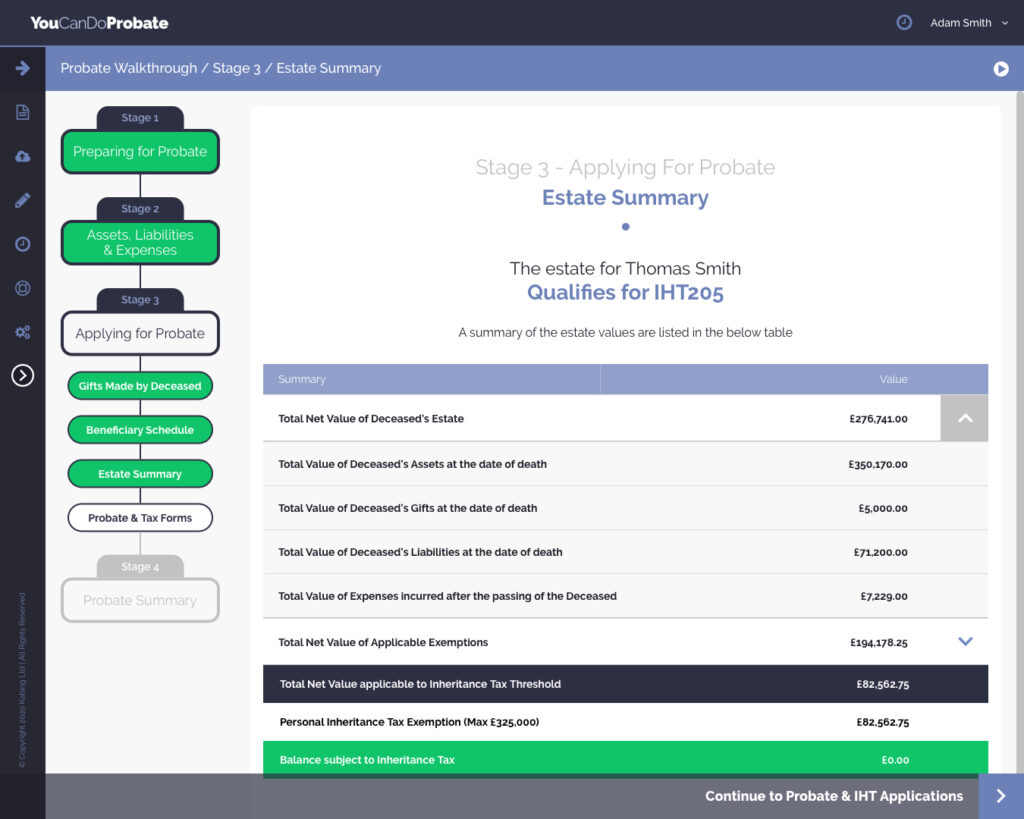
Estate Summary #
Useful Articles related to Estate Summary:
Exemptions explained
Transfer of Unused Nil Rate Band
What if the estate does not qualify?
The Estate Summary is where, if applicable, any exemptions are deducted against the estate values, and a final confirmation, that the estate will qualify to submit an IHT205 Return of Estate Application Form, and that no inheritance tax is due on the estate.
- Click on the ‘Purple Down Arrow’ icon to view the make-up of the ‘Total Net Value of Deceased’s Estate’.

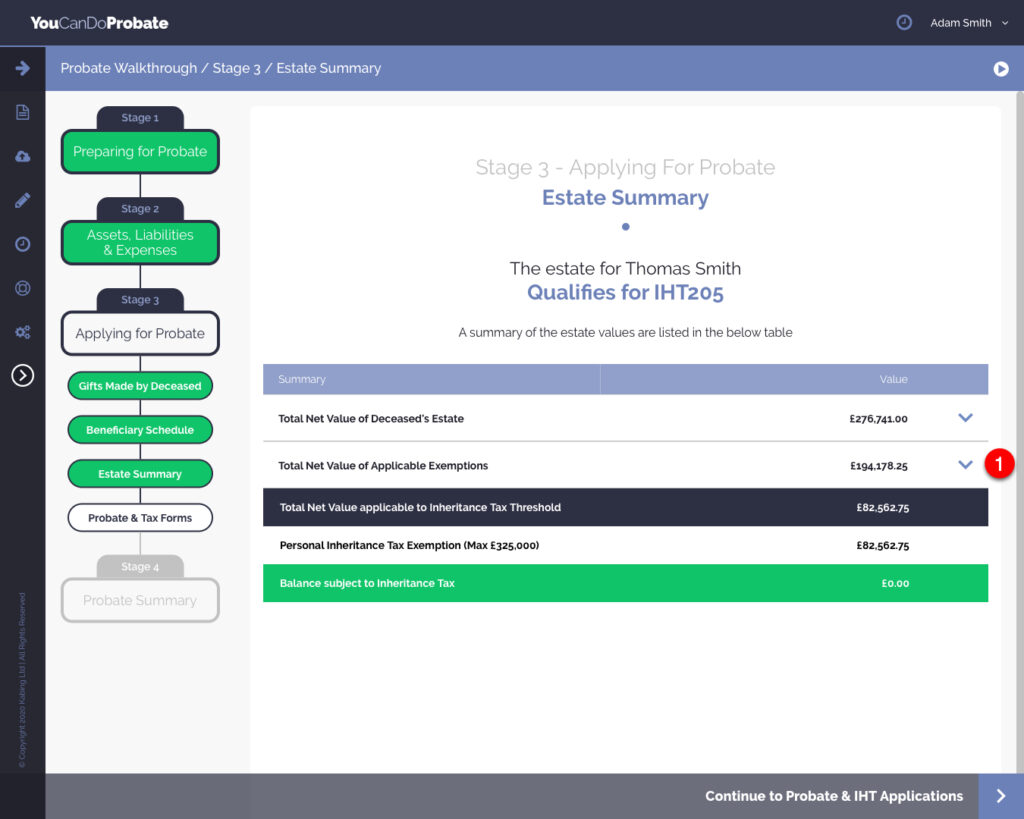
If there are any applicable exemptions;
- Click on the ‘Purple Down Arrow’ icon to view the make-up of the ‘Total Net Value of Applicable Exemptions’.

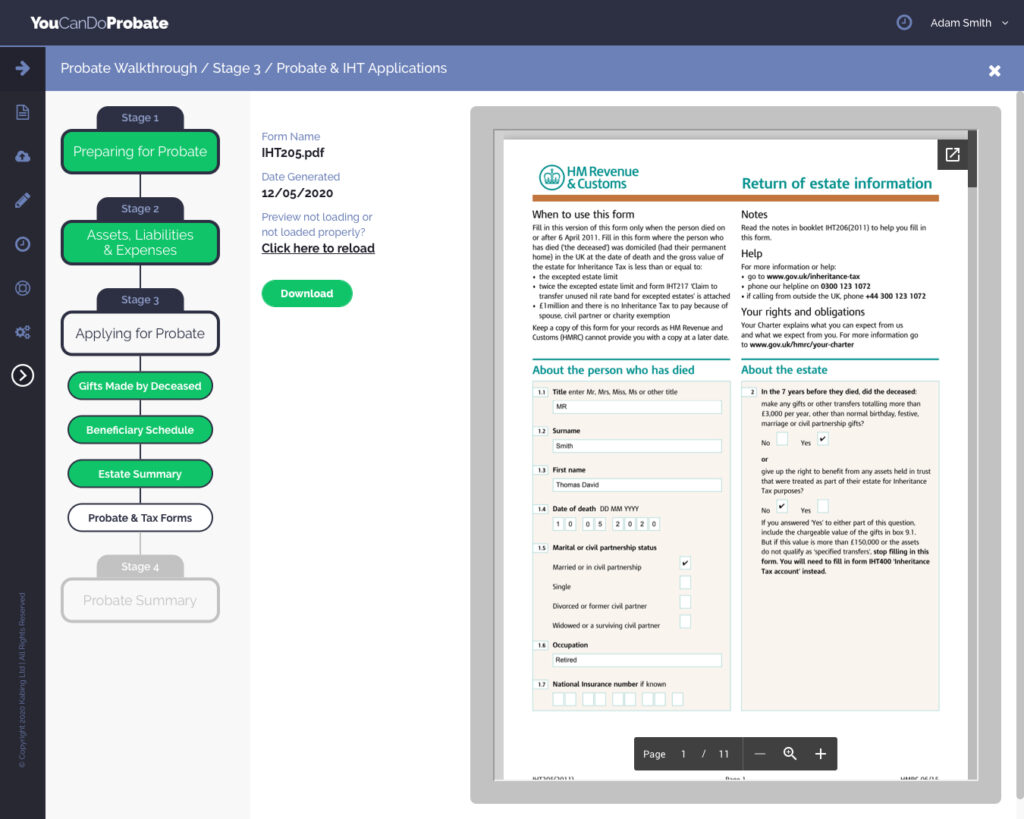
Probate & Tax Forms #
Once you have generated the Probate & Application Forms;
- Click on each of the ‘Purple Arrow’ icons to view and download each PDF document. Each PDF can be quickly accessed in the Letters & Documents section from the Fly-Out Menu.
- Carefully read and follow the instructions in the ‘READ ME BEFORE POSTING APPLICATION FORMS’ PDF

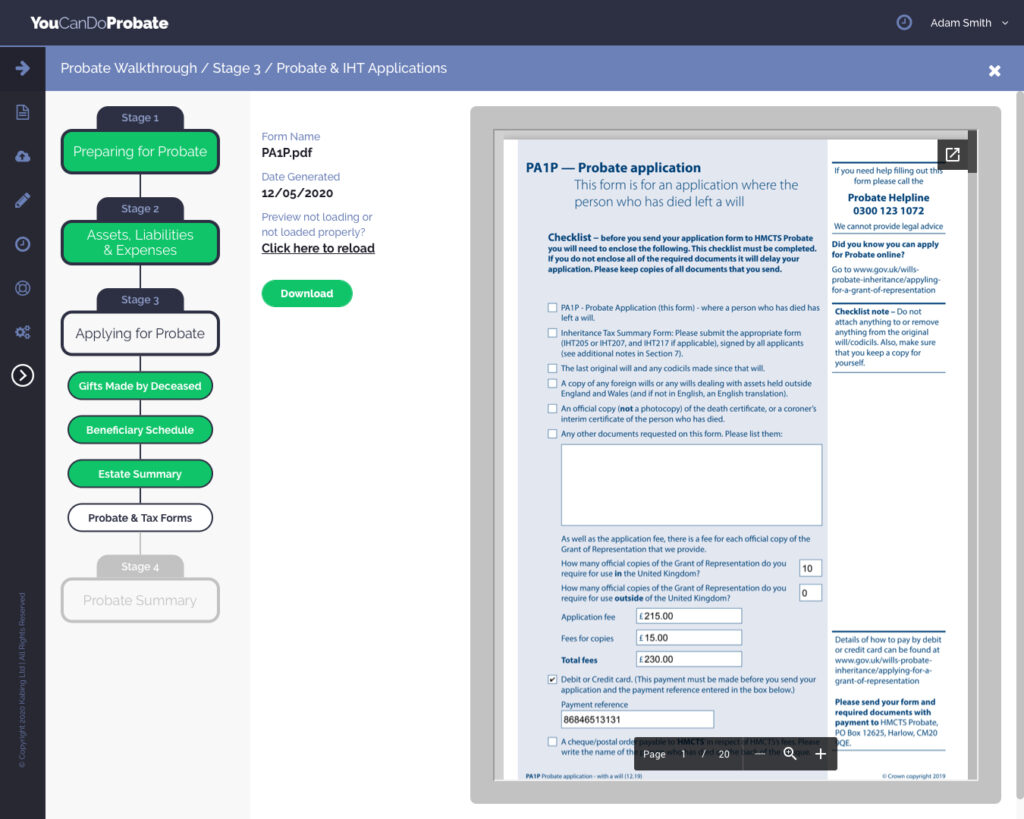
- When you have completed the instructions in the ‘READ ME BEFORE POSTING APPLICATION FORMS’ PDF, post your completed application forms to the address shown.
- Tick the purple checkbox in the Posted column of the table.
- To assign the section as complete, click on the ‘I have Printed, Checked & Posted the Application(s)’ arrow in the purple box, on the bottom right of your browser window.

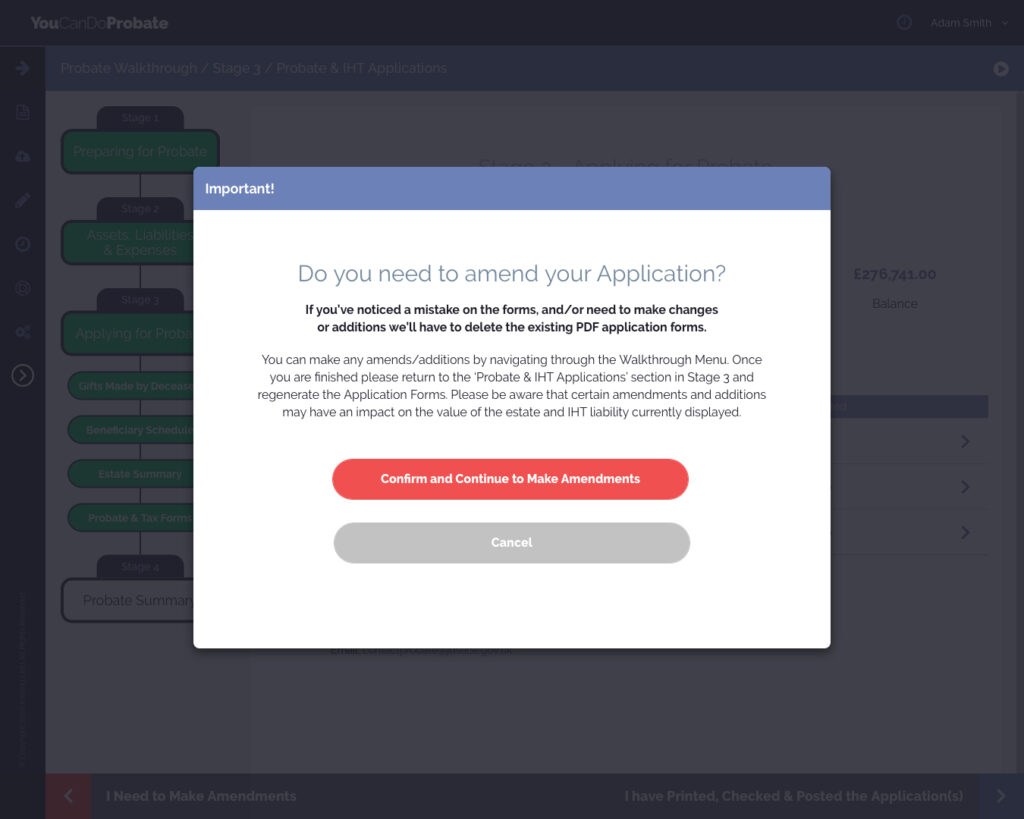
- If you need to make changes once you have generated your application forms, click on the ‘I Need to Make Amendments’ arrow in the red box, on the bottom left of your browser window.
- If you’ve noticed a mistake on the forms, and/or need to make changes or additions, the PDF application forms, the existing PDF will have to be deleted.
- Once confirmed, you can make any amendments or additions by navigating through the ‘Probate Walkthrough Menu’. Once you are finished please return to ‘Stage 3 > Probate & IHT Applications’ and regenerate the Application Forms. Please be aware that certain amendments and additions may have an impact on the value of the estate and IHT liability currently displayed and might change the eligibility of the estate.

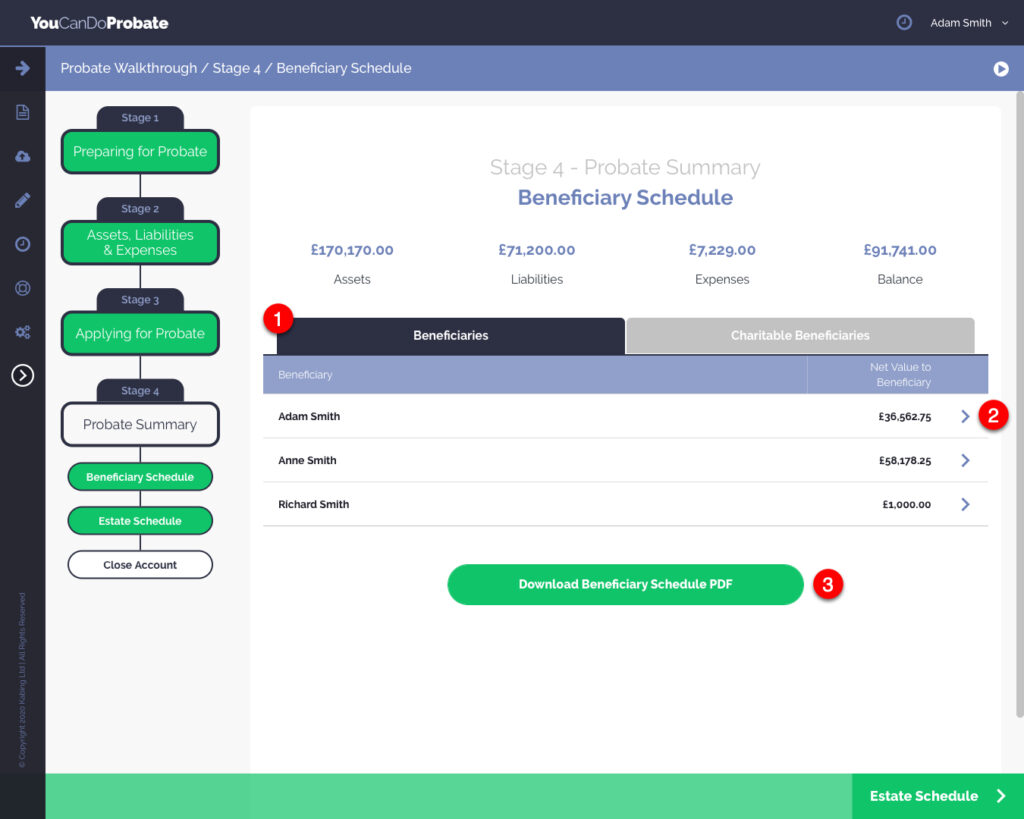
Stage 4 Beneficiary Schedule #
The Stage 4 Beneficiary Schedule (or Intestacy Schedule if there is no Will) allows you to, again, access a detailed entitlement of what each Beneficiary is due, based on the estate value at the date of death.
- Click on the tabs at the top of the schedule table to view either Beneficiaries or Charitable Beneficiaries.
- Click on the ‘Purple Arrow’ icon next to a Beneficiary to download an Individual Beneficiary’s PDF Schedule.
- Click on the green ‘Download Beneficiary Schedule PDF’ button for a complete PDF version of the Beneficiary Schedule.
Estate Schedule #
Useful Articles
What to do when you receive the Grant of Probate
What to do if you discover an error after you have submitted the application forms
What to do if the value of the estate changes and you need to claim a transfer of unused nil rate band after you have received the Grant of Probate
The Estate Schedule allows you to view all of the information of the assets, liabilities and expenses listed in the estate, based on the estate value at the date of death.
- Click between the tabs at the top of the schedule table to view Assets & Liabilities Solely Owned, Assets & Liabilities Jointly Owned and Expenses.
- Click on the ‘Purple Arrow’ icon next to a record to view details of an asset, liability or expense.
